DIY coaster ideas are a fun and creative way to protect your tables from water rings and heat damage while adding a personal touch to your home decor. Whether you’re a beginner or have some crafting experience, these 21 DIY coaster ideas will inspire you to create unique, functional pieces that suit your style.
Table of Contents
From natural materials to colorful designs, DIY coaster projects offer endless possibilities to keep your furniture safe and stylish. I remember making my first set of coasters with simple cork and paint, and it was surprisingly satisfying to see how something so small could make such a difference.
Classic Cork Coasters with Painted Patterns

Cork is a popular material for DIY coasters due to its natural water resistance and easy availability. Adding painted patterns can transform simple cork into charming, personalized coasters.
You can use stencils or freehand designs with acrylic paint to create geometric shapes, floral motifs, or abstract art. Once dry, seal the paint with a clear varnish to protect your design and make your coasters durable.
These coasters are lightweight, practical, and add a cozy touch to any table setting.
Steps:
- Cut cork sheets into desired coaster sizes.
- Sketch your design lightly with a pencil.
- Paint your patterns using acrylic paint and brushes.
- Let the paint dry completely before applying a clear sealant.
- Allow the sealant to dry and your coasters are ready to use.
Marble Tile Coasters with Felt Backing

Using marble tiles as coasters brings an elegant and modern look to your home. These coasters are easy to make by simply adding felt pads to the bottom to prevent scratching your table.
Marble is naturally heat resistant and easy to clean, making it ideal for protecting surfaces. You can also customize marble tiles by painting abstract designs or adding gold leaf accents for a touch of luxury.
This project requires minimal effort but delivers a sleek, stylish result.
Steps:
- Purchase small marble tiles at a hardware store.
- Clean the tile surfaces thoroughly.
- (Optional) Decorate the tiles with paint or gold leaf.
- Attach felt pads to the bottom corners.
- Let decorations dry before placing on tables.
Wood Slice Coasters with Burned Designs

Wood slice coasters bring a rustic charm and natural beauty to your table protection. Using a woodburning pen, you can etch delicate designs, initials, or patterns into the wood surface.
This method gives your coasters a warm, handcrafted feel. Make sure to sand the slices smoothly before burning and seal them with a protective finish.
Wood slices vary in thickness and size, so you can create a set with unique shapes and textures that celebrate nature.
Steps:
- Gather wood slices of similar thickness.
- Sand surfaces smooth to prepare for burning.
- Sketch designs lightly with pencil.
- Use a woodburning tool to etch your patterns.
- Apply a clear sealant to protect the wood and design.
Resin Coasters with Embedded Flowers

Resin coasters with embedded flowers capture the beauty of nature in a glossy, durable finish. Using clear epoxy resin, you can encase dried flowers, leaves, or small decorative items inside coaster molds.
This technique preserves the delicate details while creating a waterproof surface that protects your table. Resin crafting requires patience and care but results in stunning, personalized coasters that are conversation starters.
The final product is smooth, shiny, and perfect for any decor style.
Steps:
- Dry flowers or leaves completely beforehand.
- Mix clear epoxy resin according to instructions.
- Pour a thin layer of resin into silicone molds.
- Place dried flowers carefully on the resin layer.
- Pour additional resin to cover the flowers fully.
- Allow resin to cure for 24-48 hours.
- Remove coasters from molds and sand edges if needed.
Fabric Coasters with Quilted Layers

Fabric coasters are soft, washable, and easy to customize with colors and patterns you love. Quilted fabric coasters add thickness and absorbency, perfect for catching moisture.
You can create them using scraps of fabric sewn together in layers with batting inside. Experiment with patchwork designs or appliqué to give your coasters a unique flair.
These coasters bring warmth and texture to your table and are machine washable, making upkeep simple.
Steps:
- Cut fabric pieces and batting to coaster size.
- Layer fabric and batting, pinning layers together.
- Sew layers with quilting stitches to secure.
- Trim edges evenly and add binding if desired.
- Press coasters with an iron and they’re ready.
Tile Mosaic Coasters with Colorful Grout

Mosaic coasters made from small tile pieces add vibrancy and artistry to your table protection. By arranging tile shards in patterns and filling gaps with colorful grout, you create a textured, eye-catching surface.
This DIY project allows for endless creativity in color combinations and shapes. Once dry, the grout seals the tiles together, making the coasters sturdy and water-resistant.
Mosaic coasters bring a playful and artistic vibe to your home.
Steps:
- Collect small tile pieces or broken ceramics.
- Arrange pieces on a coaster base in desired pattern.
- Apply grout over tiles, filling all spaces.
- Wipe excess grout and let it dry completely.
- Seal the surface with a grout sealer for durability.
Concrete Coasters with Embedded Stones

Concrete coasters give an industrial, modern look while being tough and heat resistant. Embedding decorative stones or glass pieces in the wet concrete adds texture and visual interest.
Using silicone molds, you can create smooth, uniform shapes and customize them with paint or sealant once dry. Concrete coasters are heavy enough to stay put and offer a cool tactile feel that contrasts nicely with warm drinks.
Steps:
- Prepare silicone molds for coaster shapes.
- Mix concrete according to package instructions.
- Pour concrete halfway into molds.
- Place decorative stones or glass pieces on top.
- Fill molds fully with concrete and smooth surface.
- Let concrete cure for 24 hours.
- Remove from molds and optionally seal the coasters.
Leather Coasters with Stamped Designs

Leather coasters offer a sleek and sophisticated option for protecting tables. Using leather stamping tools, you can impress initials, patterns, or motifs into the leather surface for personalized detail.
Leather is naturally durable and water-resistant when treated properly, making it perfect for coasters. Choose thick leather pieces, cut to size, and finish edges with wax or polish.
These coasters age beautifully, developing a rich patina over time.
Steps:
- Cut leather into coaster-sized squares or circles.
- Use stamping tools to emboss your designs.
- Apply leather conditioner or wax to protect surface.
- Let conditioner absorb before use.
- Optionally, add felt backing to prevent slipping.
Paper Quilling Coasters with Intricate Swirls

Paper quilling uses strips of paper rolled and shaped into decorative designs that can be sealed into coasters. This delicate craft creates intricate swirls and patterns that add a whimsical, artistic flair.
After arranging the quilled paper on a sturdy base, coat the surface with resin or clear glue to protect it from moisture. Paper quilling coasters are lightweight and colorful, perfect for adding a handcrafted touch to your coffee table.
Steps:
- Cut and roll thin paper strips into coils and shapes.
- Arrange quilled pieces on a coaster base in desired design.
- Glue quilled pieces securely onto the base.
- Coat the surface with resin or clear-drying glue.
- Allow to dry fully before use.
Seashell Coasters with Clear Resin Finish

Seashell coasters bring a beachy vibe to your home decor. Collect small, flat seashells and arrange them in silicone molds to create natural, textured coasters.
Pour clear epoxy resin over the shells to encase and protect them, creating a smooth, glossy surface. These coasters highlight the beauty of seashells while offering practical table protection.
They’re perfect as gifts or for adding coastal charm to your living space.
Steps:
- Gather flat seashells and clean them thoroughly.
- Arrange shells inside silicone coaster molds.
- Mix and pour clear epoxy resin over the shells.
- Allow resin to cure for 24-48 hours.
- Remove coasters from molds and sand edges if needed.
Pressed Leaf Coasters with Laminated Finish

Pressed leaf coasters showcase the simple beauty of nature with real leaves preserved inside a laminated surface. Press leaves flat using heavy books, then arrange them on a coaster base.
Cover the coaster with clear adhesive laminate sheets or use a laminating machine to seal in the leaves. This method keeps leaves vibrant and protected from moisture and wear.
These coasters add a fresh, organic aesthetic and are easy to make with minimal supplies.
Steps:
- Press leaves flat between heavy books for several days.
- Cut leaf shapes to fit coaster bases.
- Place leaves onto coaster surfaces.
- Cover coasters with clear adhesive laminate sheets.
- Trim edges neatly and your coasters are ready.
Upcycled CD Coasters with Decoupage Art

Old CDs can become stylish coasters with decoupage techniques. Using decorative paper or fabric scraps, you can glue designs onto the shiny side of the CD, then seal with multiple layers of decoupage glue or varnish.
This repurposing project transforms waste into artful, functional coasters. The reflective surface adds an interesting base, and the paper designs bring color and pattern.
These coasters are lightweight and waterproof once sealed properly.
Steps:
- Clean old CDs and dry thoroughly.
- Cut decorative paper or fabric to CD size.
- Apply decoupage glue and adhere the paper to CD surface.
- Smooth out wrinkles and air bubbles.
- Apply several layers of decoupage glue or varnish.
- Let dry completely between layers.
Concrete Tile Coasters with Geometric Paint

Concrete tiles painted with geometric designs offer a modern, artistic way to protect your table. Start with plain concrete tiles and use painter’s tape to create sharp lines and shapes.
Use acrylic paint or paint pens in contrasting colors to enhance visual impact. Finish with a waterproof sealant to protect the paint and surface.
These coasters combine industrial materials with graphic art for a bold statement piece.
Steps:
- Clean concrete tile surfaces.
- Apply painter’s tape to outline geometric shapes.
- Paint within taped sections with acrylic paint.
- Remove tape carefully once paint is dry.
- Seal the painted tile with waterproof sealant.
Clay Coasters with Imprinted Textures

Clay coasters allow for tactile and visual creativity by imprinting textures or patterns before baking. Use air-dry or oven-bake clay to shape coaster circles or squares.
Press leaves, lace, or stamps gently into the surface to create interesting textures. After drying or baking, paint or seal your coasters to enhance durability.
Clay coasters are customizable and have a unique handmade feel that stands out on any table.
Steps:
- Roll out clay to desired thickness and cut coaster shapes.
- Press objects or stamps into clay to create textures.
- Let clay dry or bake according to instructions.
- Paint or seal coasters as desired.
- Allow final finish to dry before use.
Recycled Newspaper Coasters with Mod Podge

Recycling newspaper into coasters is eco-friendly and artistic. Roll strips of newspaper tightly into flat coil shapes, then glue layers together with Mod Podge or craft glue to form sturdy coasters.
Seal the surface with multiple coats of Mod Podge for waterproofing. These coasters have a vintage, textured look and showcase creative reuse of everyday materials, making them conversation-worthy additions to your home.
Steps:
- Cut newspaper into long strips.
- Roll strips tightly into flat circular shapes.
- Glue layers together with Mod Podge.
- Apply several coats of Mod Podge on surface.
- Let dry completely between coats.
Jute Rope Coasters with Spiral Design

Jute rope coasters bring natural, rustic charm and are surprisingly simple to make. By coiling strong jute rope tightly in a spiral and securing it with hot glue or craft glue, you create sturdy, textured coasters that absorb moisture well.
These coasters complement farmhouse or nautical decor styles and add warmth to your table setting. Customize them by adding painted accents or attaching small decorations.
Steps:
- Cut jute rope to desired length.
- Begin coiling rope tightly in a spiral shape.
- Secure coils with hot glue as you go.
- Trim and glue the end securely.
- Optionally, add paint or decorations.
Tile and Wood Combo Coasters for Contrast

Combining ceramic tiles with wood bases creates coasters with beautiful contrast and durability. Attach small tiles to wooden squares or circles using strong adhesive.
The tile top resists heat and moisture, while the wood underside protects your table and adds warmth. You can paint or stain the wood base for customization.
These coasters balance natural and refined elements in one practical piece.
Steps:
- Cut wood pieces to coaster size.
- Sand and finish wood bases as desired.
- Use strong adhesive to attach ceramic tiles to wood.
- Allow glue to dry fully.
- Add felt pads to wood bottom to prevent scratching.
Painted Slate Coasters with Chalkboard Surface

Slate coasters with a chalkboard finish let you personalize messages or doodles for each use. Start with natural slate pieces and paint the top surface with chalkboard paint.
Once dry, you can write and erase designs freely with chalk, perfect for parties or daily fun. Seal the edges and bottom of the slate to protect tables from scratches.
These coasters blend function with playful creativity.
Steps:
- Clean slate pieces and let dry.
- Apply several coats of chalkboard paint on top surface.
- Seal edges and bottom with clear varnish.
- Allow paint and varnish to dry completely.
- Use chalk to write or draw on coasters.
Glass Pebble Coasters with Mosaic Arrangement

Glass pebble coasters feature smooth, colorful stones arranged in mosaic patterns on sturdy bases. Use strong adhesive to secure flat-backed glass pebbles in designs that suit your style.
Seal with waterproof grout or resin to fill gaps and protect the surface. These coasters shimmer beautifully in sunlight and are perfect for adding a splash of color and texture to your decor.
Steps:
- Select flat-backed glass pebbles in various colors.
- Arrange pebbles on coaster bases in desired patterns.
- Glue pebbles securely in place.
- Fill gaps with waterproof grout or clear resin.
- Allow the filler to dry completely.
Knitted Yarn Coasters with Cozy Textures

Knitted yarn coasters add softness and warmth to your tabletop protection. Use thick cotton or wool yarn to knit small circles or squares, creating textured patterns that absorb moisture.
These coasters are easy for knitters of all levels and can be customized with colors and stitch styles. They’re perfect for a cozy, handmade feel and are machine washable for easy care.
Steps:
- Choose a thick yarn and appropriate knitting needles.
- Cast on stitches to form coaster size.
- Knit in your preferred stitch pattern.
- Bind off and weave in ends.
- Wash gently before first use.
Silicone Molded Coasters with Custom Shapes
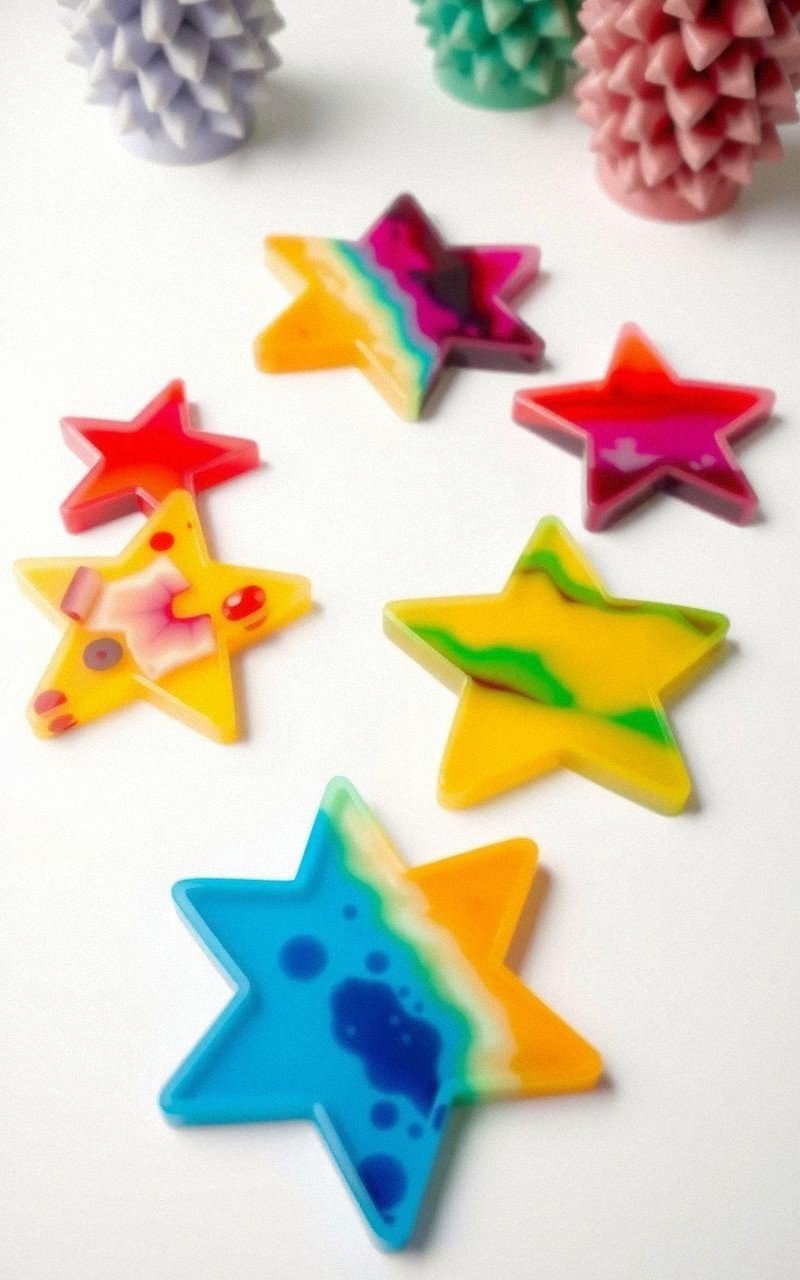
Silicone molds allow you to make coasters in fun, custom shapes using resin, concrete, or clay. Choose molds in shapes like stars, leaves, or abstract forms to create unique coasters that suit your personality.
Pour your chosen material into the mold, let it set, then remove and finish edges if needed. These coasters can be decorated with paint, embedded items, or left plain for a modern look.
Steps:
- Select silicone molds with desired coaster shapes.
- Prepare material (resin, concrete, or clay) for casting.
- Pour or press material into molds evenly.
- Allow material to cure or dry fully.
- Remove coasters and smooth edges if necessary.