Decoupage Home Decor Projects bring simple objects to life with paper, pattern, and gloss. I first fell for decoupage decor while rescuing a thrifted tray, layering botanical prints until it felt like a travel scrapbook.
Table of Contents
These decoupage projects turn everyday corners into scenes that feel storied and personal.
From trays and planters to lamps and mirrors, home decor decoupage invites color and texture without a big overhaul. Whether the vibe leans cottage, modern, or boho, Decoupage Home Decor Projects offer a relaxed, artistic route to refresh space, gift something heartfelt, and surround a room with character.
Vintage Botanical Serving Tray With Glassy Shine

A plain wooden tray transforms into a botanical tableau, featuring layered florals, ferns, and delicate butterflies. Tissue papers or napkins deliver translucent petals, while thicker scrapbook prints add depth and borders.
A satin or high-gloss topcoat creates café-style sheen, and a pale base keeps colors bright. Flecks of metallic leaf along the rim introduce a gentle glimmer without overpowering the artwork.
This piece sits beautifully on an ottoman or bar cart, or frames breakfast in bed with a garden mood. Wrapped in kraft paper with twine, it becomes a gracious housewarming present with timeless charm.
Steps
- Lightly sand and prime the tray, then apply a neutral base coat.
- Cut botanical papers, arrange the layout, and adhere with decoupage medium.
- Smooth bubbles, let dry, and add metallic leaf accents along edges if desired.
- Seal with multiple clear coats, allowing dry time between layers.
Ocean-Themed Tissue Box For Breezy Bathrooms
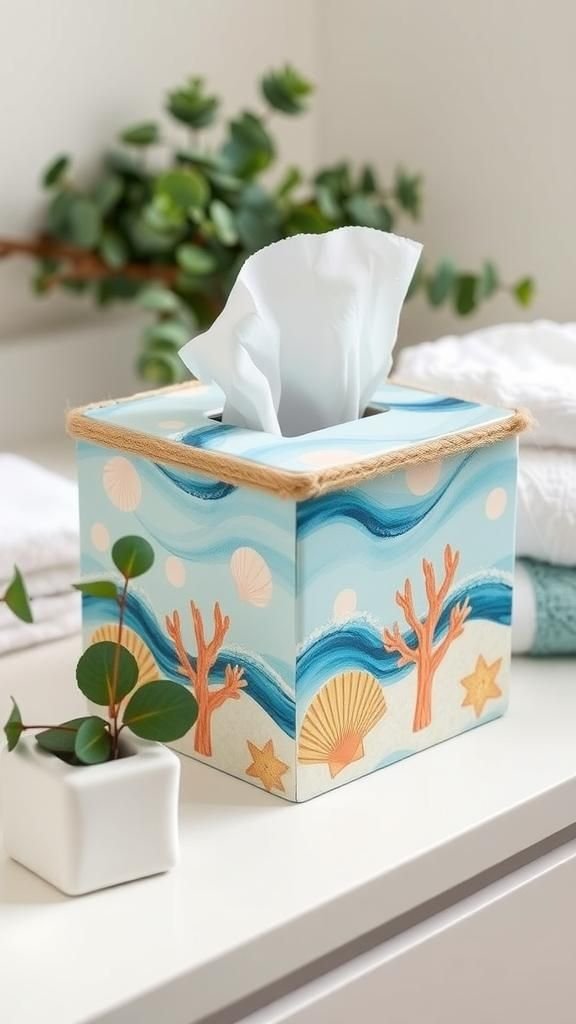
A standard cube dispenser becomes a coastal accent with shells, sea fans, and watercolor waves. Soft blues and sea-glass greens feel spa-like, while sandy beige borders echo shoreline hues.
Thin papers blend seamlessly over corners, and a matte finish keeps the palette tranquil. A rope trim or jute accent around the opening introduces tactile contrast without overwhelming the gentle imagery.
Perfect beside a sink with white towels and eucalyptus sprigs, it anchors a seaside vignette. Gift-ready with a box of lotion tissues and a sprig of dried lavender tucked beneath a ribbon.
Steps
- Prime the box and brush on a pale aqua base coat.
- Cut ocean motifs and adhere in gentle layers, smoothing as you go.
- Add jute or rope trim around the opening with strong adhesive.
- Topcoat with matte sealer for a soft, beach-worn look.
Mid-Century Geometric Coasters In Bold Hues
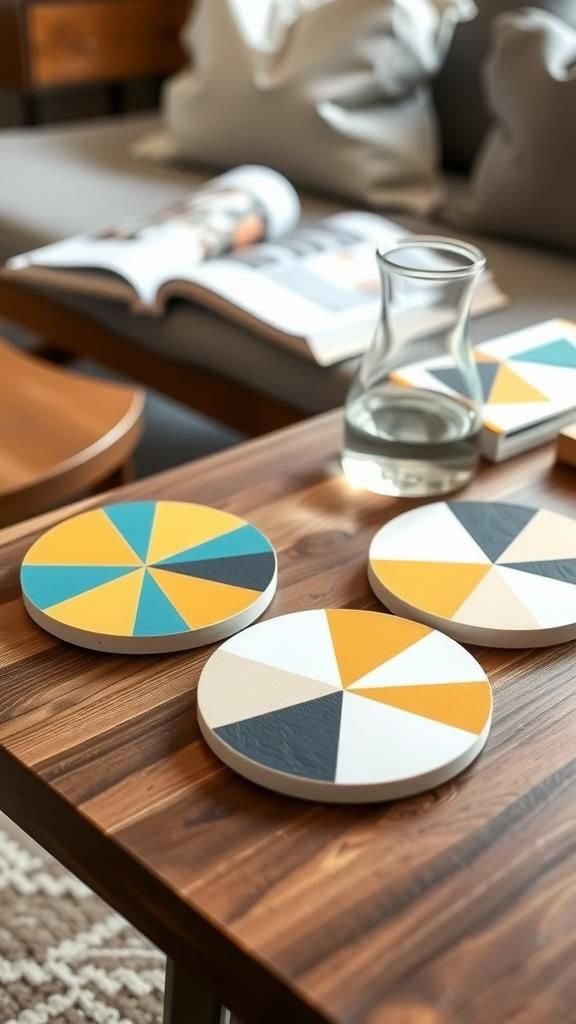
Graphic triangles, circles, and offset stripes deliver a lounge-era vibe across a set of wooden or cork coasters. High-contrast palettes—mustard, teal, charcoal, and ivory—pair with a sleek satin sheen.
Layered papers create crisp shapes without messy lines, while color blocking defines each tile as a mini artwork. Rounded edges feel polished on a coffee table and sit neatly in a low-profile holder.
Wrapped in a simple sleeve with a color swatch tag, the set becomes a stylish host present. On display, stacked beside a carafe and a design book, they signal modern taste.
Steps
- Prime coaster bases and apply a neutral or colored base coat.
- Cut geometric shapes from patterned papers and adhere in planned layouts.
- Burnish gently to remove bubbles, then let dry completely.
- Apply several waterproofing topcoats, drying between applications.
Chinoiserie Planter Cachepot With Blue And White
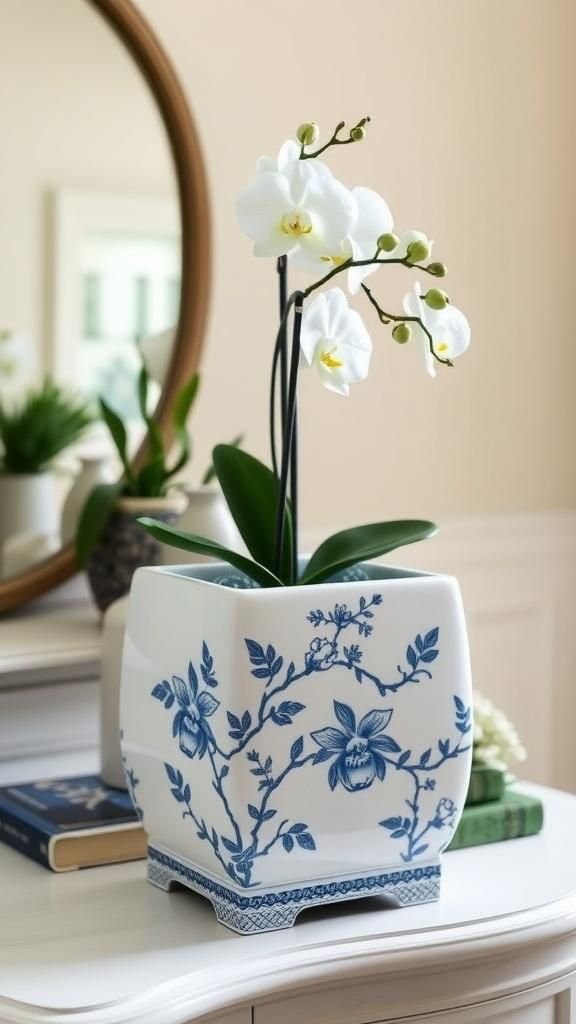
Porcelain-inspired motifs bring classical elegance to a planter cachepot. Blue florals and pagoda silhouettes float over a cloud-white base, echoing antique ceramics while remaining light and fresh.
Thin napkin layers meld seamlessly with subtle crazing effects created by the topcoat. A delicate rim accent in navy or pale gold frames the pattern.
This planter pairs beautifully with orchids, trailing ivy, or a sculptural succulent, adding height on an entry console. Presented with a small plant and a handwritten tag, it becomes a heartfelt hostess gesture.
Grouped in threes, it anchors a mantel with graceful symmetry.
Steps
- Prime the cachepot and coat with a smooth white base.
- Separate napkin layers, trim motifs, and adhere carefully around curves.
- Smooth wrinkles with a soft brush and allow thorough drying.
- Finish with clear coats and add a painted accent rim if desired.
Rustic Sheet Music Picture Frame Accent
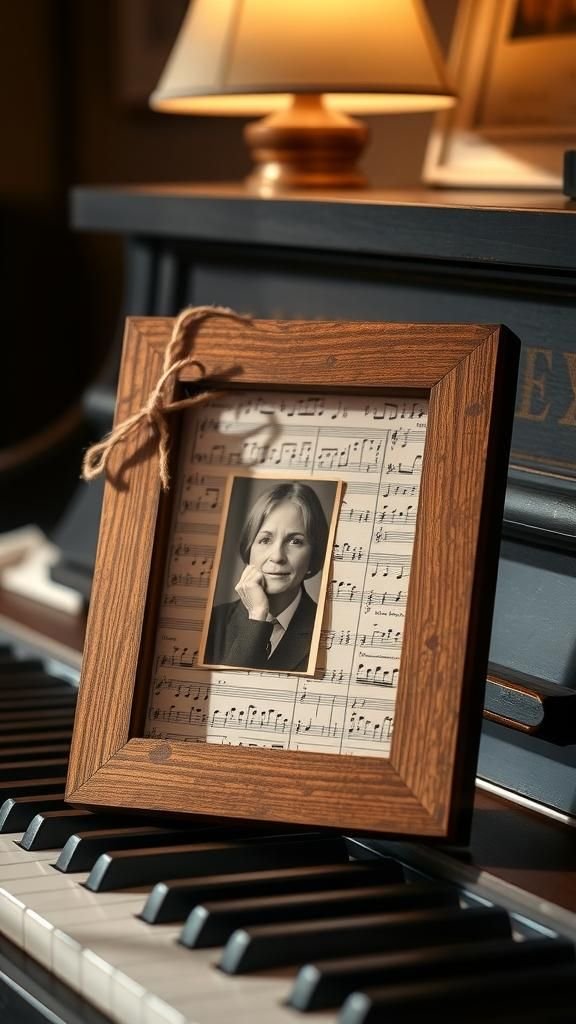
Antiqued sheet music wraps a frame with nostalgic warmth, pairing beautifully with sepia photos or black-and-white portraits. Tea-stained edges and slight distressing suggest history without heaviness.
A soft matte topcoat keeps glare down, while narrow twine or linen ribbon edges contribute texture. Neutral notes and staff lines harmonize with farmhouse rooms and Parisian corners alike.
Standing on a piano or hanging above a console, it feels personal and poetic. Bundled with a vintage-style print inside, it becomes a thoughtful gift for music lovers that blends sentiment with subtle style.
Steps
- Remove glass and backing, prime the frame, and apply a warm base.
- Tear or cut music sheets, adhere around the frame, and smooth.
- Age the edges with light stain or ink, then let dry.
- Seal with a matte topcoat and reassemble the frame.
Map-Covered Accent Table With Wanderlust Flair
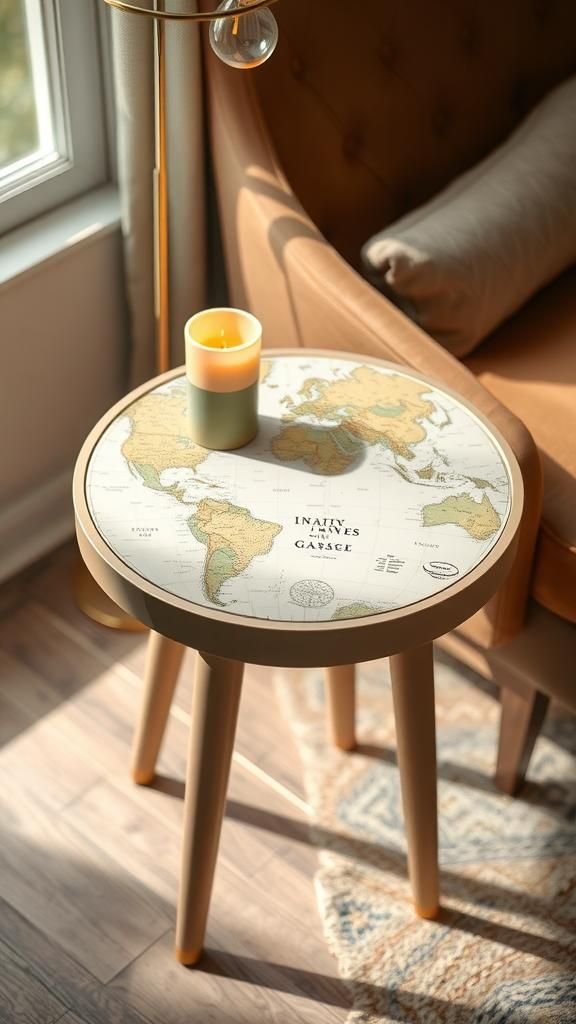
A small side table showcases world maps across its top, creating a conversation surface that sparks daydreams. Muted atlases or pastel city grids define the design direction, while a clear, smooth topcoat encourages coffee cups and novels to land there without worry.
Painted legs can match a color pulled from the cartography, or remain neutral to let the paper sing. Brass feet or a slender gallery edge bring polish.
Perfect in a reading nook with a candle and a tiny globe, it also shines as a graduation gift for a traveler at heart.
Steps
- Sand and prime the table top; apply a base coat if desired.
- Trim map sections, adhere across the surface, and align seams.
- Burnish gently to remove air pockets and let dry thoroughly.
- Add multiple protective coats, sanding lightly between for smoothness.
Floral Lampshade Revival With Soft Diffused Glow

Sheer florals over a drum lampshade create a gentle garden glow when the light clicks on. Lightweight papers permit illumination and keep patterns delicate, with watercolor blooms and leaves drifting around the curve.
A linen-wrapped base or rattan lamp pairs well, and thin ribbon edging finishes the silhouette. The palette can sway blush and sage for romantic bedrooms or navy and mustard for eclectic corners.
On a nightstand, it projects evening calm; on a desk, it delivers artistic energy. Tucked into a gift basket with a scented candle, it feels thoughtful and bright.
Steps
- Remove the shade, wipe clean, and apply a thin adhesive coat.
- Position floral papers in sections, smoothing gently around the curve.
- Trim excess at the top and bottom and add ribbon edging.
- Seal lightly if compatible with your materials, then reinstall.
Mediterranean Tile-Inspired Backsplash Panels
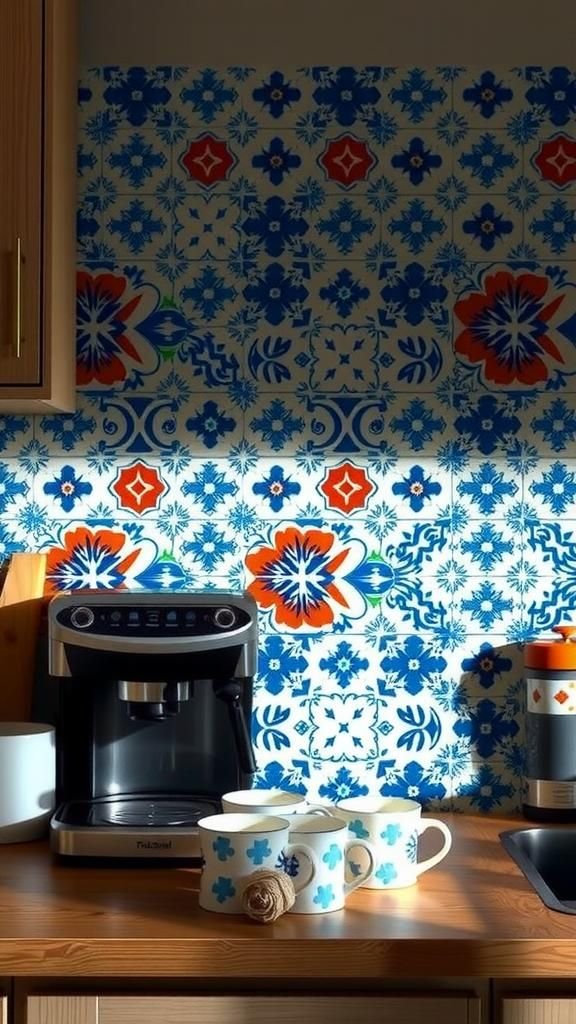
Removable panels dressed in tile-print papers mimic glazed ceramics without grout. Indigo arabesques, sun-washed terracottas, or lemony Amalfi motifs deliver kitchen brightness that feels vacation-ready.
A satin topcoat brings wipe-clean practicality, while crisp white cabinets frame the pattern like a gallery. Thin plywood or acrylic bases keep weight low and installation friendly.
Seasonal swaps become easy, refreshing the scene with new colors. Wrapped with a recipe card and tea towel, a set becomes an apartment-friendly present.
Propped behind a coffee station, the panels transform daily rituals into a cheerful ritual.
Steps
- Cut panel substrates to size and prime the surfaces.
- Adhere tile-print papers, aligning repeats for seamless flow.
- Smooth bubbles and trim edges precisely with a craft knife.
- Seal with multiple coats for durability and mount with removable strips.
Whimsical Toy Storage Bin With Storybook Scenes
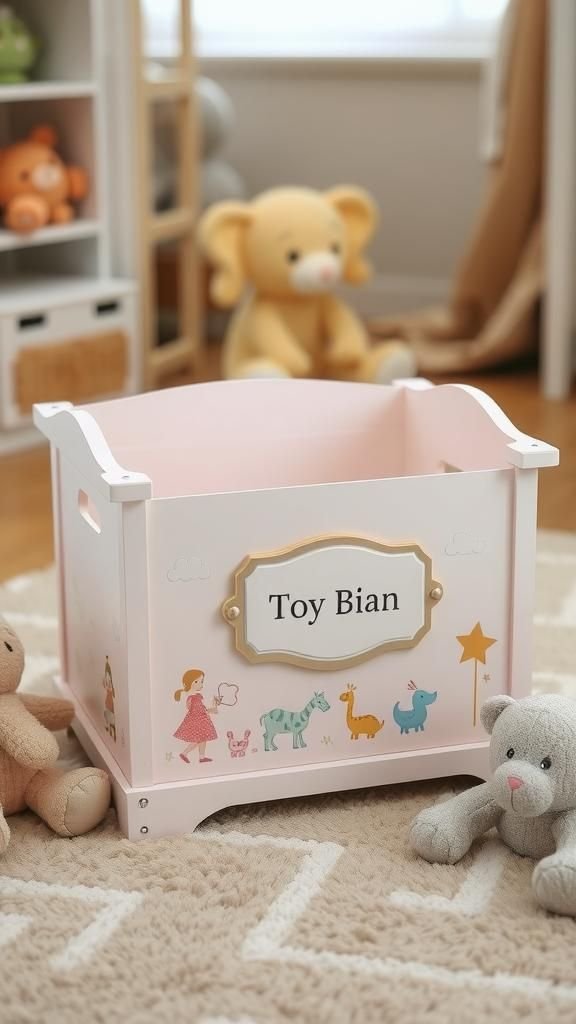
A plain bin gains charm through storybook illustrations, creating a playful home for plush animals and blocks. Pastel skies, forests, and friendly characters wrap the sides, while a name plaque on the front personalizes the piece.
Rounded corners and a satin topcoat keep the look sweet and durable. Soft felt pads on the base protect floors and add a finished touch.
In a nursery, it tucks under a window seat; in a playroom, it anchors a reading corner. Paired with a board book and ribbon, it becomes a thoughtful baby shower surprise.
Steps
- Prime the bin and apply a pastel base color.
- Arrange illustration panels and adhere smoothly around each side.
- Add a name label or wooden tag to the front.
- Topcoat for protection and let cure before filling.
Farmhouse Recipe Tin Canisters With Label Charms
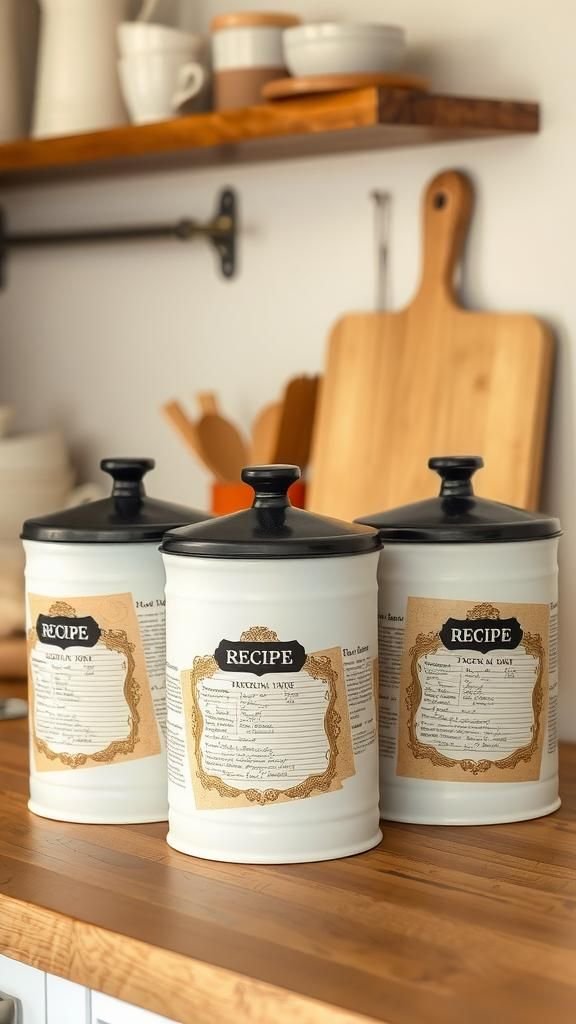
Metal canisters dressed in vintage recipe clippings bring pantry nostalgia to a countertop. Creamy backgrounds, handwritten notes, and sketched utensils create a curated collage, while black enamel lids or wooden knobs finish the farmhouse feel.
Matte or eggshell topcoats downplay glare, letting the script take center stage. Tiny chalk labels or stamped tags mark contents and add good humor.
Grouped near a breadboard and ceramic measuring cups, the trio feels cozy and functional. Gifted with homemade biscotti or tea packets, it delivers warmth that lingers long after the treats are gone.
Steps
- Degrease canisters and apply a bonding primer.
- Cut recipe snippets and wrap them in overlapping layers.
- Add labels or tags and let everything dry fully.
- Seal with a food-safe adjacent topcoat on the exterior only.
Marbled Bookends With Veined Stone Illusion

Faux marble papers turn simple bookends into gallery objects. Smoke-gray veining on white suggests Carrara, while deep green with gold lines leans toward luxurious malachite.
A glass-smooth topcoat and felt underpads lend polish and protect shelves. Pairing with linen-bound novels or art magazines gives the set a boutique sensibility.
On a mantel, they frame a small sculpture; on a desk, they corral sketchbooks with quiet authority. Presented in a kraft box with tissue and a vellum wrap, the pair feels thoughtful and stylish for new grads or bibliophiles.
Steps
- Prime the bookend surfaces and apply base color if needed.
- Wrap with marbled papers, smoothing corners and edges.
- Trim cleanly along the base and add felt pads underneath.
- Finish with a high-gloss sealer for a stone-like sheen.
Art Deco Mirror Border With Glam Graphic Flair
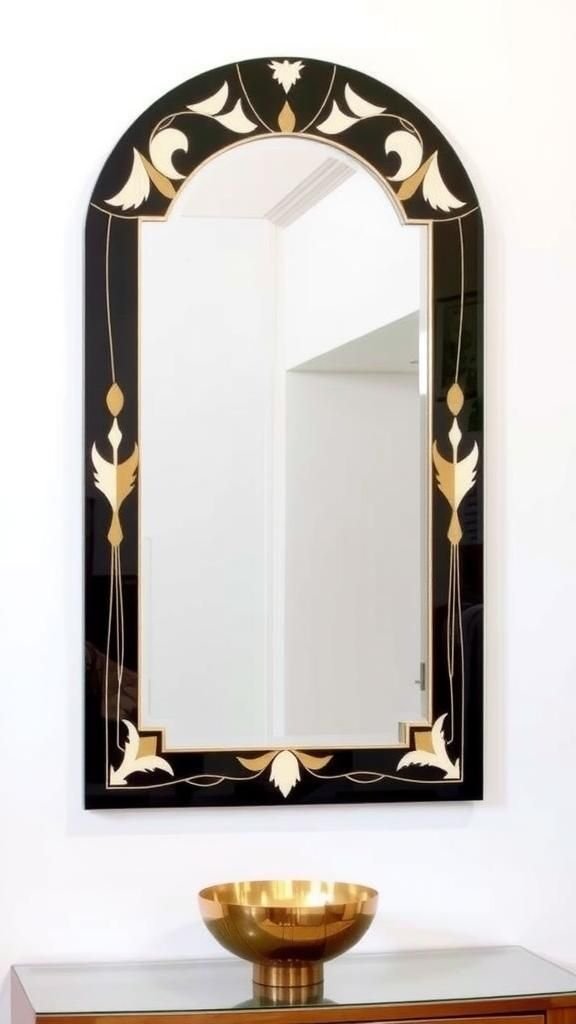
A plain mirror gains drama with a border of Art Deco motifs in black, ivory, and metallic accents. Fan shapes, chevrons, and sunbursts echo jazz-age theaters, while a sleek satin to gloss finish catches morning light.
The pattern rings the glass on a slim wooden frame or a removable mat surrounding the mirror. A touch of brushed brass hardware nearby completes the story.
In an entry, it nods to cocktail-hour glamour; in a powder room, it adds elegance without overwhelming scale. A thoughtful wedding present when paired with a small perfume tray.
Steps
- Mask the glass area and prime the frame or mat.
- Apply Deco-patterned papers around the border, aligning repeats.
- Add metallic accents with foil or pen where desired.
- Seal with clear coats and remove masking once cured.
Garden Herb Pots With Illustrated Labels
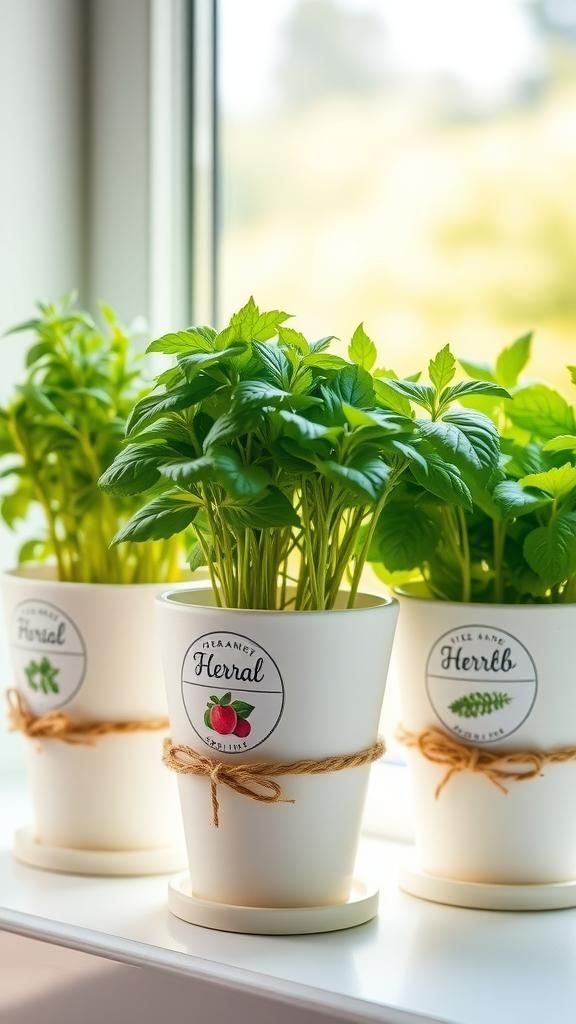
Terracotta or ceramic pots become a tiny apothecary of basil, thyme, and rosemary through illustrated botanicals and tidy labels. Soft greens and ink-style drawings read both fresh and classic, while a chalky base color adds rustic texture.
Thin rope or cotton twine at the rim complements the garden mood. On a sunny sill, the trio perfumes the room; on a dining table, it doubles as centerpiece and seasoning station.
Wrapped together in a wooden crate with seed packets, the set makes a thoughtful weekend host token with kitchen appeal.
Steps
- Prime pots with a masonry-friendly primer and apply a chalky base.
- Adhere botanical illustrations and label plaques to each pot.
- Smooth edges, let dry, and add twine around the rims.
- Seal lightly to protect from splashes, avoiding soil contact areas.
Wine Crate Wall Shelf With Graphic Facades
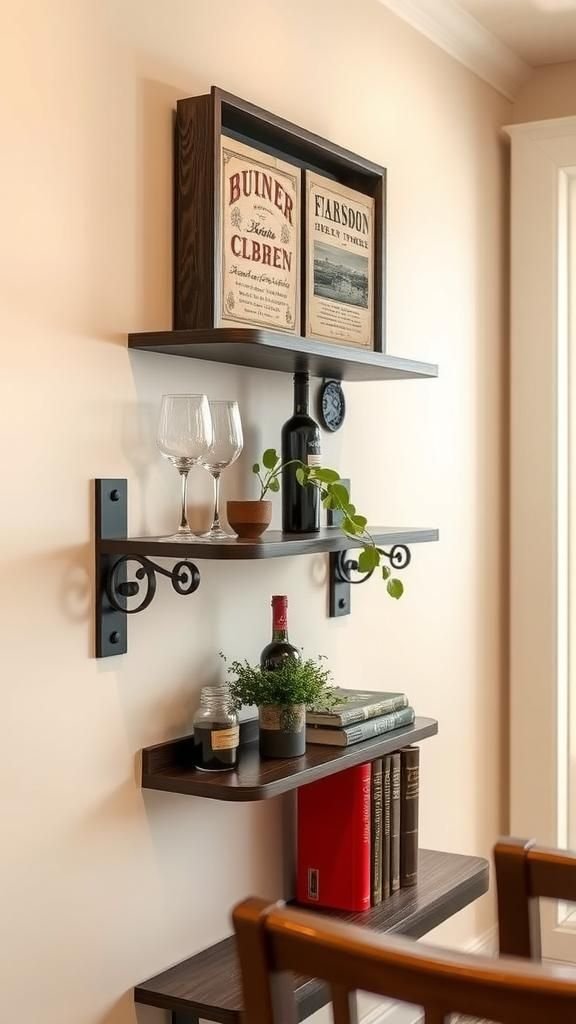
A simple wall shelf dressed in wine-label papers channels a tasting room vibe. Creamy labels, embossed crests, and Bordeaux reds create an inviting collage across the front faces, while the shelf body stays neutral for balance.
A satin topcoat and matte black brackets lend a refined finish. Positioned in a dining nook, it holds stemware and small plants; in a kitchen, it supports spice jars and cookbooks.
Packaged with a corkscrew and linen towel, it turns into a charming hostess gesture that keeps the party spirit alive.
Steps
- Cut label papers to match the shelf fronts and prime surfaces.
- Adhere labels in an overlapping collage, smoothing as you go.
- Trim clean edges and let dry completely.
- Seal with satin coats and mount the shelf securely to studs.
Holiday Candle Holders With Vellum Glow

Clear glass cylinders gain seasonal magic through vellum prints of snowflakes, evergreens, or stars. When candles flicker inside, silhouettes glow softly, creating a frosted window effect.
The translucent layer stays calm and elegant, while a thin metallic band at the rim adds a festive note. Grouped on a mantel or along a table runner, they cast gentle light without glare.
Presented as a set with tea lights and a sprig of cedar, they land as a thoughtful seasonal token that stores compactly after celebrations.
Steps
- Measure glass height and cut vellum prints to size.
- Wrap and adhere the vellum around each cylinder evenly.
- Add a narrow metallic tape or ribbon accent at the rim.
- Allow adhesive to cure before placing candles inside.
Jewel-Tone Keepsake Jewelry Box Upgrade

A small wooden box becomes a treasure with jewel-tone florals, peacock feathers, or damask motifs. Emerald, sapphire, and amethyst shades shimmer under a glossy topcoat, while a velvet-lined interior heightens the boutique feeling.
A delicate knob or tassel provides a final flourish without competing with the pattern. On a vanity, it corrals rings and brooches; on a nightstand, ticket stubs and love notes.
Wrapped in tissue with a satin ribbon, it works as a birthday surprise or bridesmaid gesture that feels richly personal and easy to cherish.
Steps
- Prime the box and apply a coordinating base color.
- Cut and adhere patterned papers across lid and sides.
- Add a knob or tassel hardware, then let dry thoroughly.
- Finish with glassy clear coats for depth and durability.
Coastal Seashell Wall Clock Face Refresh
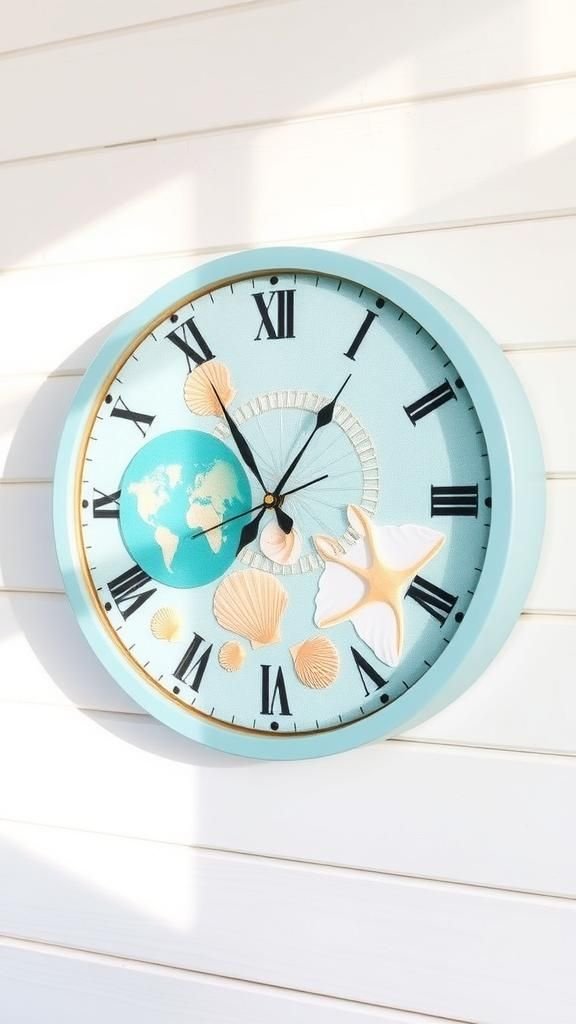
A wall clock face gains coastal calm through seashell sketches, sand dollars, and tide lines. Muted aquas and warm taupe keep the palette serene, while crisp numerals remain clear against layered imagery.
A satin topcoat reduces glare, and natural fiber rope edging or a whitewashed frame completes the shoreline story. In a kitchen or sunroom, it invites unhurried afternoons.
Paired with a small jar of collected shells, it becomes a heartfelt gift for beach lovers who appreciate gentle reminders of salt air and soft waves.
Steps
- Remove the clock hands and clean the face thoroughly.
- Adhere seashell papers, aligning numerals or adding new markers.
- Reinstall hands after sealing with a satin topcoat.
- Hang and enjoy the refreshed coastal look.
Fabric-Lined Drawer Fronts Dresser Refresh
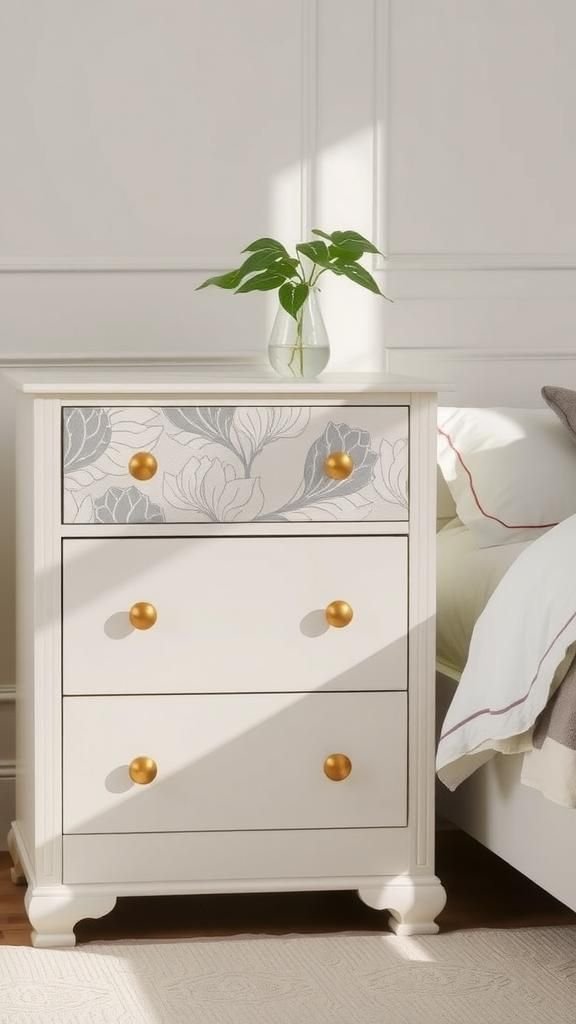
Patterned textiles translated through decoupage give drawer fronts a custom boutique feel. Linen stripes, floral chintz, or modern block prints set the tone, while ceramic or brass knobs complement the palette.
Drawer sides can show a pop of contrast when opened, adding a hidden smile. A protective topcoat keeps everyday wear at bay, and the overall effect revitalizes a vintage dresser without heavy overhaul.
In a guest room, it pairs with crisp bedding; in a hallway, it anchors a gallery wall. A lovely housewarming gesture when paired with scented sachets.
Steps
- Remove hardware, clean fronts, and apply a bonding primer.
- Adhere fabric or fabric-printed papers smoothly across each front.
- Trim edges, reinstall knobs, and ensure drawers slide freely.
- Seal with a durable topcoat and let cure before loading.
Boho Hanging Wall Plaque Trio With Layers
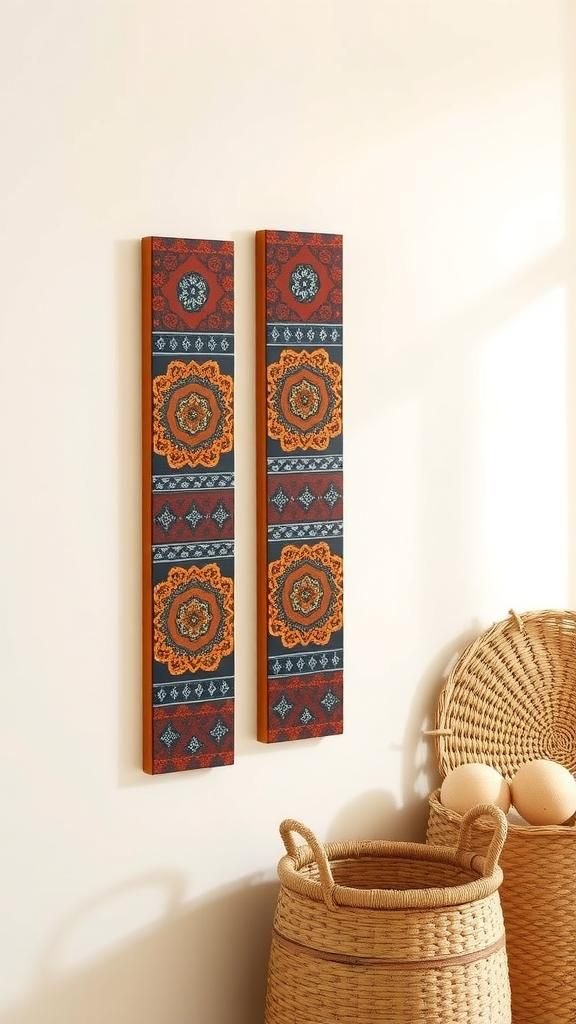
Three slender plaques combine global prints, mandalas, and textured neutrals for an artful vertical arrangement. A warm palette of terracotta, indigo, and ochre plays nicely with woven baskets and kilim pillows.
Subtle metallic ink accents catch the light without going flashy, while leather or jute hangers continue the earthy mood. Stacked on a narrow wall, the trio adds height and rhythm; over a bed, it acts as a soft headboard substitute.
Gifted as a set, tied with cord and a tiny tassel, it arrives ready to charm a boho-leaning friend.
Steps
- Prime wooden plaques and base coat with coordinating colors.
- Layer patterned papers and mandala elements on each plaque.
- Edge with metallic pen details and attach hanging hardware.
- Seal thoroughly and string with jute for a vertical trio.
Traveler’s Suitcase Side Table With Postmarks
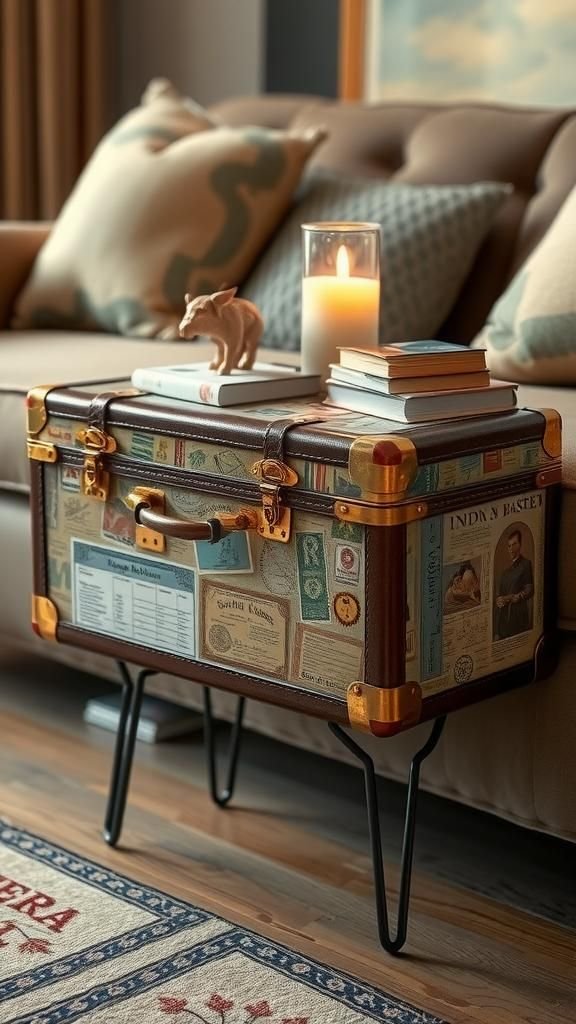
Postal stamps, vintage tickets, and air mail stripes turn an old suitcase into a whimsical side table. The collage spans the lid and sides, while leather corners and brass clasps remain as heritage accents.
A clear coat adds durability and emphasizes the patina. Hairpin legs or a wooden base elevate the piece to table height, bringing storytelling energy beside a sofa.
A small stack of travel books and a candle complete the tableau. As a gift, it delights anyone who keeps boarding passes tucked away for nostalgia.
Steps
- Clean the suitcase exterior and repair loose trims.
- Arrange travel ephemera papers and adhere in a cohesive collage.
- Drill and mount hairpin legs or a base securely.
- Seal the exterior to protect imagery and let cure.
Monochrome Typography Light Switch Plate Covers

Switch plates receive a minimalist makeover with black-and-white typography, newsprint, or letterpress patterns. Clean lines and high-contrast text add graphic punch without dominating a room.
A satin topcoat lends a ceramic-like feel, while edges remain crisp for a neat install. Matching outlet covers carry the theme across a wall for cohesion.
In an office, the look reads editorial; in a kitchen, it introduces playful wit. Presented as a small set tied with baker’s twine, it makes a clever, budget-friendly present that still feels thoughtful and design-forward.
Steps
- Remove plates and clean surfaces thoroughly.
- Adhere trimmed typography papers, aligning text neatly.
- Pierce screw holes, trim edges, and let dry fully.
- Seal with a satin topcoat and reinstall plates.