There’s something so satisfying about creating DIY Candle Holders that perfectly match your home vibe. When I first tried making DIY Candle Holders, I spilled wax everywhere, but the thrill of crafting unique DIY Candle Holders kept me hooked.
Table of Contents
From rustic DIY Candle Holders to chic glass DIY Candle Holders, each piece tells its own story, glowing softly on shelves and tables. I’ve learned that DIY Candle Holders can transform a dull corner into a cozy nook, and experimenting with different materials makes DIY Candle Holders even more exciting.
Every time I gift my friends handmade DIY Candle Holders, they’re amazed at how personalized DIY Candle Holders can be.
Colorful Crayon Candle Holder

This colorful crayon candle holder is a fun and creative way to brighten up any space. It features a circle of vibrant crayons surrounding a small candle, creating a playful and cheerful look. The melting wax adds a unique touch, making it perfect for kids’ rooms or art-themed events.
To make your own crayon candle holder, gather some crayons, a small candle, and a heat-safe base. Start by peeling the wrappers off the crayons. Arrange them in a circle around the candle, ensuring they are tightly packed. You can glue them down for extra stability. Once everything is in place, light the candle and enjoy the colorful glow!
Geometric Concrete Candle Holder

The geometric concrete candle holder is a stylish and modern piece that adds a unique touch to any space. Its sharp angles and clean lines create a striking visual effect, making it a perfect centerpiece for your table or shelf.
To make your own geometric concrete candle holder, you’ll need a few materials. Start with concrete mix, a mold (you can use plastic containers or silicone molds), and a candle. You might also want some sandpaper for smoothing edges and a small mixing container.
Begin by mixing the concrete according to the package instructions. Pour the mixture into your mold, filling it about halfway. Insert a small container in the center to create a space for the candle. Let it set for the recommended time. Once it’s dry, carefully remove the holder from the mold.
Next, use sandpaper to smooth any rough edges. You can leave it in its natural gray color or paint it for a more personalized look. Finally, place your favorite candle in the holder, light it up, and enjoy the warm glow it brings to your home!
Rustic Mason Jar Candle Holder
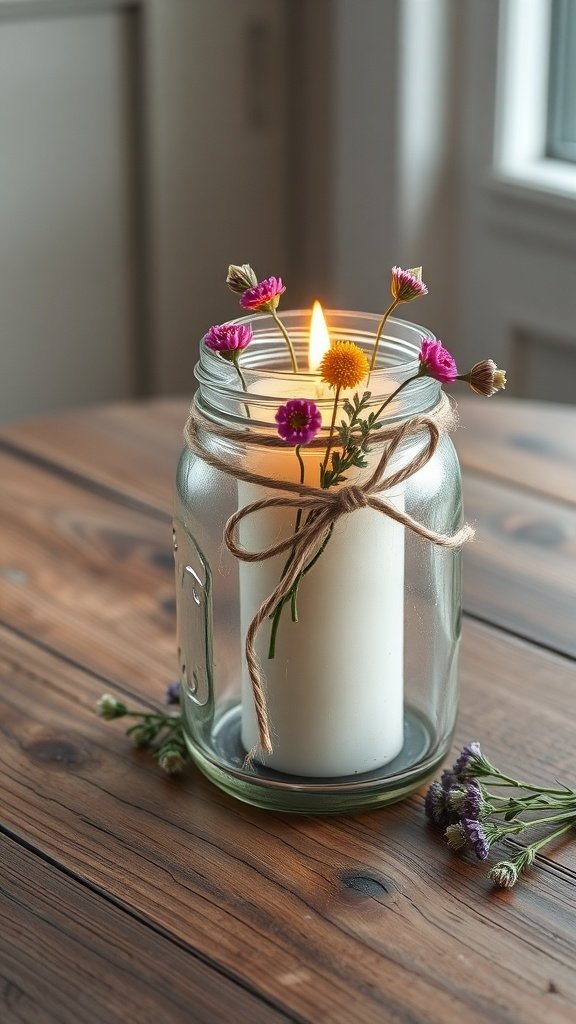
Creating a rustic mason jar candle holder is a fun and easy project that adds charm to any space. This simple design features a glass jar, a candle, and some lovely flowers, making it perfect for both indoor and outdoor settings.
To start, gather your materials. You’ll need a clean mason jar, a candle (either a votive or pillar), twine or string, and some fresh or dried flowers. The flowers add a pop of color and a natural touch to your holder.
Next, place the candle inside the mason jar. If you’re using a votive candle, it should fit snugly. For a pillar candle, ensure it stands securely. Once the candle is in place, wrap the twine around the neck of the jar a few times and tie it in a bow. This not only looks cute but also helps secure the flowers.
Now, it’s time to add the flowers. You can either tuck them into the twine or place them around the candle inside the jar. Choose flowers that complement your decor. Wildflowers work great for a rustic look, but feel free to get creative!
Finally, light the candle and enjoy the warm glow it brings to your space. This rustic mason jar candle holder is perfect for gatherings, cozy nights in, or as a thoughtful gift for friends.
Upcycled Tin Can Lantern
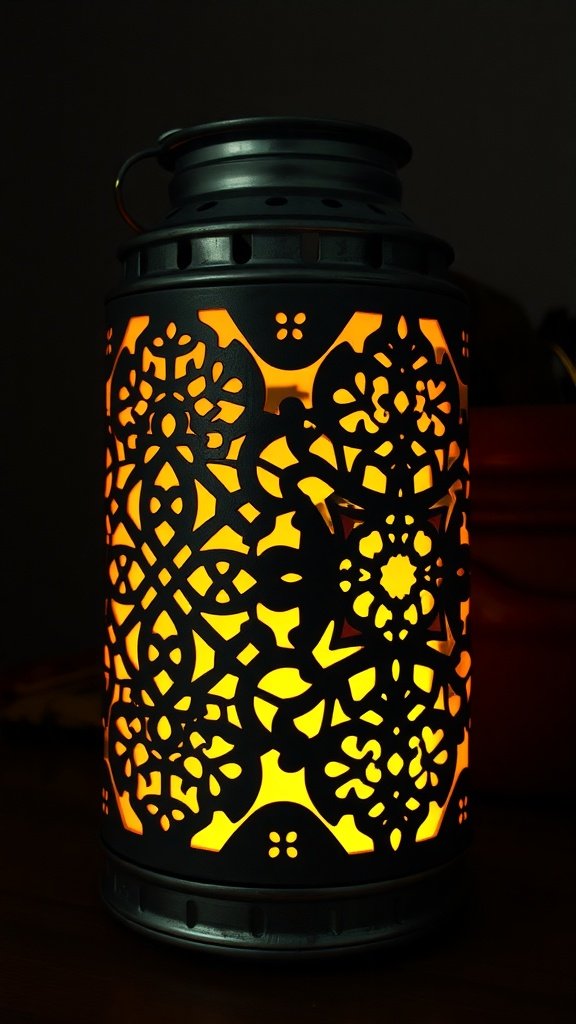
Creating an upcycled tin can lantern is a fun and eco-friendly project. This lantern not only adds charm to your space but also gives a new life to old cans. The image shows a beautifully designed lantern with intricate patterns, allowing light to shine through in a warm glow.
To make your own, start by gathering materials. You’ll need an empty tin can, a hammer, a large nail, a container of water, and a tea light or LED candle. Fill the can with water and freeze it overnight. This will help keep the can sturdy while you work.
Once frozen, take the can out of the freezer and remove the ice. Use the hammer and nail to punch holes into the can, creating your desired design. Be careful and work on a stable surface. After you finish, rinse the can to remove any metal shavings.
Next, dry the can and place your candle inside. You can hang the lantern using wire or place it on a table. Light it up and enjoy the cozy atmosphere it creates!
Hanging Macrame Candle Holder

This hanging macrame candle holder adds a cozy touch to any space. The soft glow of the candle inside creates a warm atmosphere, perfect for evenings outdoors or inside your home.
To make your own, start by gathering your materials. You’ll need macrame cord, a small glass candle holder, scissors, and a wooden ring for hanging.
Begin by cutting several lengths of macrame cord, each about 4-5 feet long. Fold them in half and attach them to the wooden ring using a lark’s head knot. This will create the base for your holder.
Next, create a series of square knots to form a net-like structure around the glass holder. Make sure to leave enough space for the candle to fit snugly inside. Continue knotting until you reach the desired height.
Once you have the net, secure the bottom with a few more knots. Trim any excess cord for a clean look. Finally, place your candle holder inside the macrame net and hang it from your chosen spot.
This DIY project not only looks great but also allows you to customize colors and styles to match your decor. Enjoy your new candle holder!
Natural Log Candle Holder
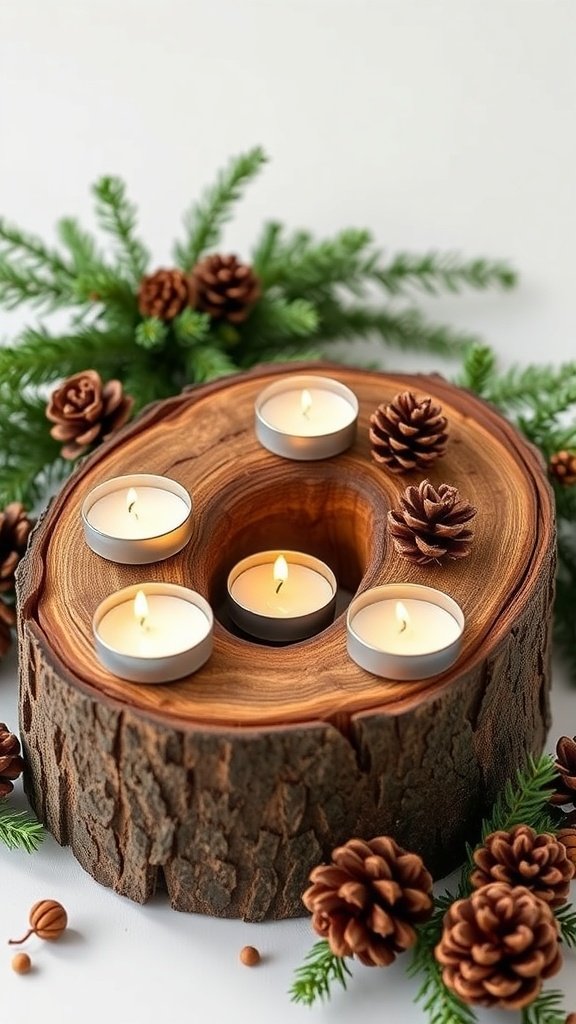
Creating a natural log candle holder is a fun and simple DIY project. It adds a rustic touch to your home decor. The image shows a beautifully crafted log with tea light candles nestled in it. Surrounding the log are pine cones and greenery, enhancing its natural feel.
To make your own, start by selecting a sturdy log. Look for one that’s about 12 inches long and 6 inches wide. Make sure it’s dry and free of any pests. You can find logs at craft stores or even in your backyard.
Next, use a drill with a hole saw attachment to create spaces for the candles. Make sure the holes are deep enough to hold the candles securely. You can fit four or five tea lights, depending on the size of your log.
After drilling, sand the edges of the holes to avoid any sharp bits. You can leave the log as is for a rustic look or paint it for a pop of color. Once ready, place the candles in the holes and arrange some pine cones and greenery around the log for decoration.
Finally, light the candles and enjoy the warm glow they provide. This natural log candle holder is perfect for cozy evenings or festive gatherings!
Glass Bottle Candle Holder
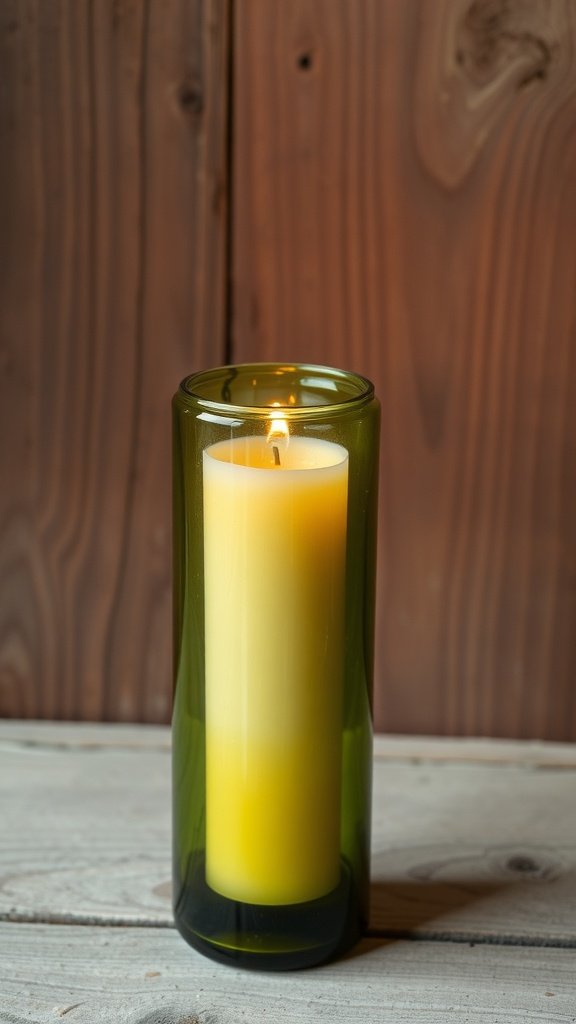
Using a glass bottle as a candle holder is a fun and eco-friendly project. The image shows a beautiful green glass bottle with a candle inside, creating a warm glow. This simple design adds a touch of charm to any space.
To make your own glass bottle candle holder, start by gathering your materials. You’ll need an empty glass bottle, a candle (preferably a pillar candle), and a pair of safety gloves.
First, clean the bottle thoroughly. Remove any labels and residue. You can soak the bottle in warm soapy water to make this easier. Once clean, dry it completely.
Next, carefully cut the bottle if you want a shorter holder. Use a glass cutter and follow safety precautions. If cutting isn’t your style, you can leave the bottle as is. Just make sure the candle fits snugly inside.
Place the candle inside the bottle. If it wobbles, you can use a bit of melted wax to secure it at the bottom. Light the candle and enjoy the soft glow it provides. This holder is perfect for indoor use or outdoor gatherings.
Feel free to decorate the bottle with paint, twine, or stickers to match your decor. This project is not just easy; it’s a great way to recycle and personalize your space!
Elegant Wine Glass Candle Holder

Transforming a simple wine glass into a stunning candle holder is a fun and easy DIY project. This elegant design adds a touch of sophistication to any table setting. Imagine a beautifully lit candle perched atop a delicate wine glass, casting a warm glow across the room.
To create your own wine glass candle holder, start by gathering your materials. You’ll need a clean wine glass, a candle (preferably a pillar candle), and some decorative elements like flowers or greenery for added flair.
Begin by placing the candle inside the wine glass. Make sure it fits snugly to prevent any wobbling. If you want to secure it further, you can use a bit of melted wax at the base of the candle.
Next, arrange flowers or greenery around the base of the glass. This adds a lovely touch and enhances the overall look. You can choose fresh flowers or even faux ones, depending on your preference.
Finally, light the candle and enjoy the warm, inviting atmosphere it creates. These wine glass candle holders are perfect for dinner parties, romantic evenings, or just to brighten up your home.
Vintage Teacup Candle Holder
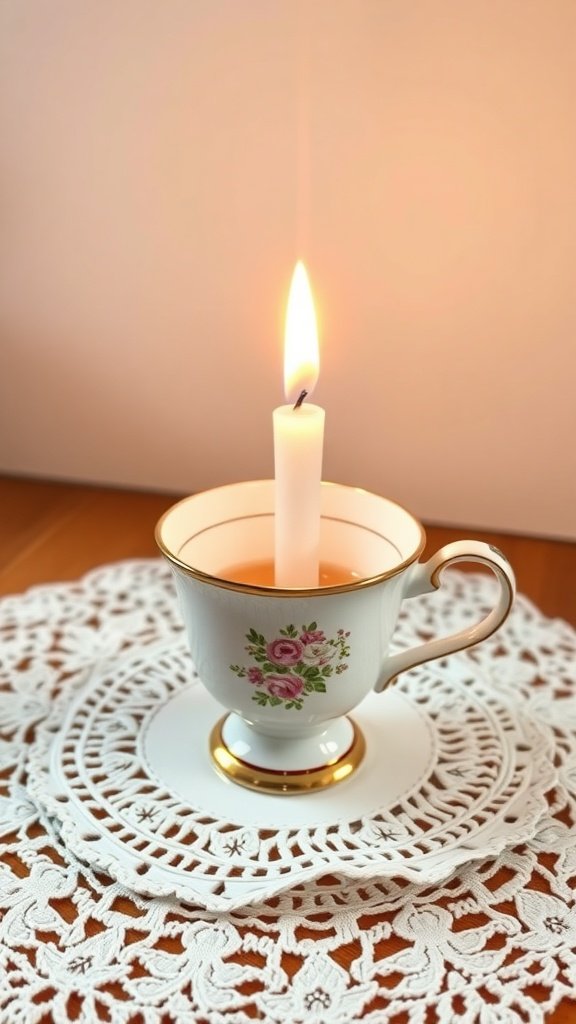
Using vintage teacups as candle holders is a charming way to add a personal touch to your home decor. The image shows a delicate teacup with a candle placed inside, creating a warm glow. This simple idea combines beauty and functionality, making it a perfect DIY project.
To create your own vintage teacup candle holder, start by gathering your materials. You’ll need a vintage teacup, a candle (preferably a taper candle), and a small plate or doily for a decorative touch. You can find teacups at thrift stores or flea markets, often at a low cost.
Next, place the teacup on the plate or doily. If the candle doesn’t fit snugly in the teacup, you can use a bit of melted wax to secure it. Melt a small amount of wax in a pot and pour it into the bottom of the teacup before placing the candle in. Allow it to cool and harden.
Once your candle is secure, light it up and enjoy the cozy atmosphere it brings. This project is not only easy but also a great way to repurpose items that might otherwise go unused. Plus, each teacup has its own unique design, making every candle holder special.
Cement Block Candle Holder
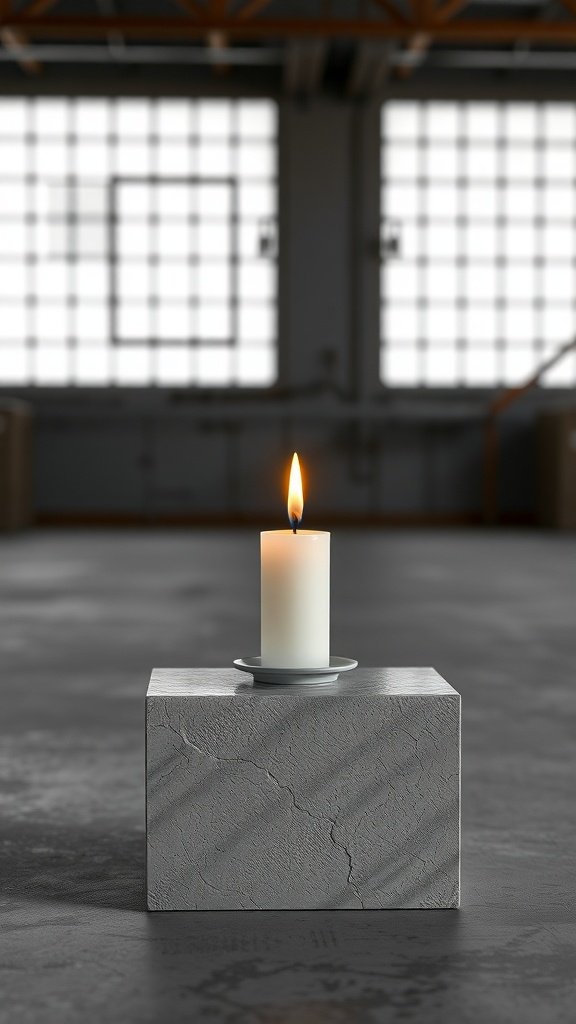
Creating a cement block candle holder is a fun and simple DIY project. This design combines modern aesthetics with a rustic touch, making it a perfect addition to any home decor.
To start, gather your materials. You will need a concrete block, a small plate or dish for the candle, and a candle that fits the dish. You can also use paint or sealant if you want to add some color or finish to your block.
First, clean the concrete block to remove any dust or debris. Then, place the small plate on top of the block. Make sure it’s centered so the candle sits evenly. If you want to secure the plate, you can use a bit of adhesive or glue.
Next, place your candle in the dish. Light it up and enjoy the warm glow it brings to your space. If you want to personalize your holder, consider painting the block or adding decorative elements like stencils or patterns.
This project is not only easy but also allows for creativity. You can experiment with different sizes of blocks and candles to create a unique look. Plus, it’s a great way to add a touch of style to your home without spending a lot of money.
Felt Ball Candle Holder

This felt ball candle holder is a fun and colorful way to brighten up your space. The vibrant colors and soft textures make it a delightful addition to any room. It’s perfect for creating a cozy atmosphere, whether you’re having a quiet night in or hosting friends.
To make your own felt ball candle holder, you’ll need a few simple materials. Start with a small candle and a holder. Gather some felt balls in various colors, a hot glue gun, and scissors. You can find felt balls at craft stores or online.
Begin by applying a small amount of hot glue to the base of the felt ball and press it onto the candle holder. Continue adding felt balls, arranging them in a pattern you like. Make sure to cover the entire surface for a vibrant look. Once you’re done, let it dry completely.
Place your candle inside the holder, light it up, and enjoy the warm glow. This DIY project is not only easy but also allows you to express your creativity. You can customize the colors to match your decor or the season!
Wire Wrapped Bottle Candle Holder

This wire wrapped bottle candle holder is a charming way to add a personal touch to your space. The image shows a green glass bottle elegantly wrapped with copper wire, creating a rustic yet modern vibe. A small tealight candle sits inside, casting a warm glow that enhances the cozy atmosphere.
Making your own wire wrapped bottle candle holder is simple and fun. Start by gathering your materials: an empty glass bottle, some wire (copper or any other color you like), a pair of wire cutters, and a tealight candle. Clean the bottle thoroughly and remove any labels.
Next, cut a length of wire about three to four feet long. Begin wrapping the wire around the bottle, starting near the top and working your way down. You can create a pattern or simply wrap it randomly for a more organic look. Make sure to leave enough space for the tealight to fit inside.
Once you’re satisfied with the wrapping, secure the wire at the bottom by twisting it tightly. Place the tealight candle inside the bottle, and your unique candle holder is ready to shine! This project is perfect for any occasion, whether you’re hosting a dinner party or just want to brighten up your home.
Terracotta Pot Candle Holder
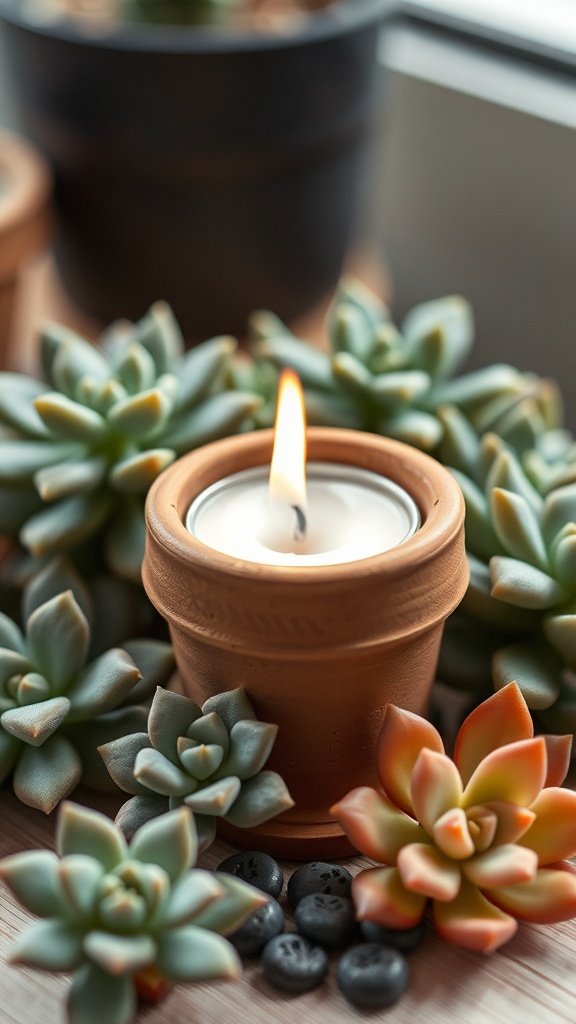
Creating a terracotta pot candle holder is a fun and simple DIY project. This charming holder adds a rustic touch to any space. The image shows a small terracotta pot with a candle inside, surrounded by beautiful succulents and smooth stones. It’s a perfect centerpiece for a table or a cozy corner in your home.
To make your own terracotta pot candle holder, you’ll need a few supplies. Start with a small terracotta pot, a candle (either a votive or a tealight), and some decorative elements like pebbles or succulents.
Here’s how to create it:
First, clean the terracotta pot to remove any dust or debris.
Next, place the candle inside the pot. If it’s a tealight, you might need to secure it with a bit of wax or adhesive.
Now, arrange the succulents and stones around the pot. This adds a lovely natural look.
Finally, find a nice spot to display your candle holder. Light the candle and enjoy the warm glow!
This DIY project is not only easy but also a great way to personalize your space. Plus, it makes for a thoughtful gift!
Fabric Scraps Candle Holder

Creating a fabric scraps candle holder is a fun and simple project that adds a personal touch to your home decor. This candle holder showcases vibrant colors and patterns, making it a delightful centerpiece for any table.
To start, gather your fabric scraps. You can use old clothes, leftover fabric from other projects, or even remnants from a craft store. Cut these scraps into small squares or rectangles, about 2 inches in size. This will give you plenty of options to mix and match.
Next, take a glass or metal container that will hold your candle. Wrap the fabric pieces around the container, securing them with hot glue or fabric glue. Make sure to overlap the edges slightly for a seamless look. You can create a pattern or go for a more random arrangement—it’s all up to your style!
Once the fabric is secured, place a candle in the center. A simple white or colored candle works well, but you can also use LED candles for safety. Light it up and enjoy the warm glow that shines through the fabric.
This project not only recycles fabric scraps but also brings a cozy vibe to your space. It’s perfect for a casual gathering or a quiet evening at home. Plus, you can easily change the fabric to match the season or your mood!
DIY Seashell Candle Holder
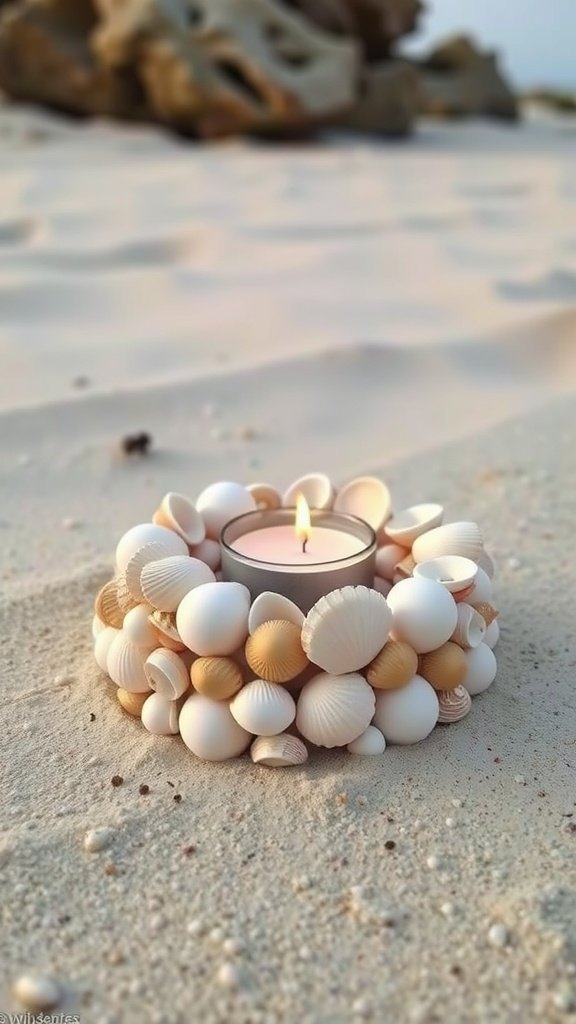
Creating a DIY seashell candle holder is a fun and simple project that brings a touch of the beach into your home. This charming holder, surrounded by various seashells, creates a cozy atmosphere and makes for a great centerpiece.
To start, gather your materials. You will need a selection of seashells, a small candle or tealight, a sturdy base (like a piece of cardboard or a small plate), and a hot glue gun. Make sure to clean the seashells thoroughly to remove any sand or debris.
Next, arrange the seashells around the base. Play with different shapes and sizes to find a layout that you like. Once you’re happy with the arrangement, use the hot glue gun to secure each shell in place. Be careful with the glue, as it can get quite hot!
After all the shells are glued down, place your candle in the center. If you’re using a tealight, you can simply set it on the base. For larger candles, ensure they fit snugly within the shell arrangement. Light the candle and enjoy the soft glow it casts through the shells.
This DIY project is not just easy; it’s also a great way to recycle seashells from your beach trips. Plus, it makes a lovely gift for friends or family who love the ocean. So gather your supplies and get crafting!
Pinecone Candle Holder
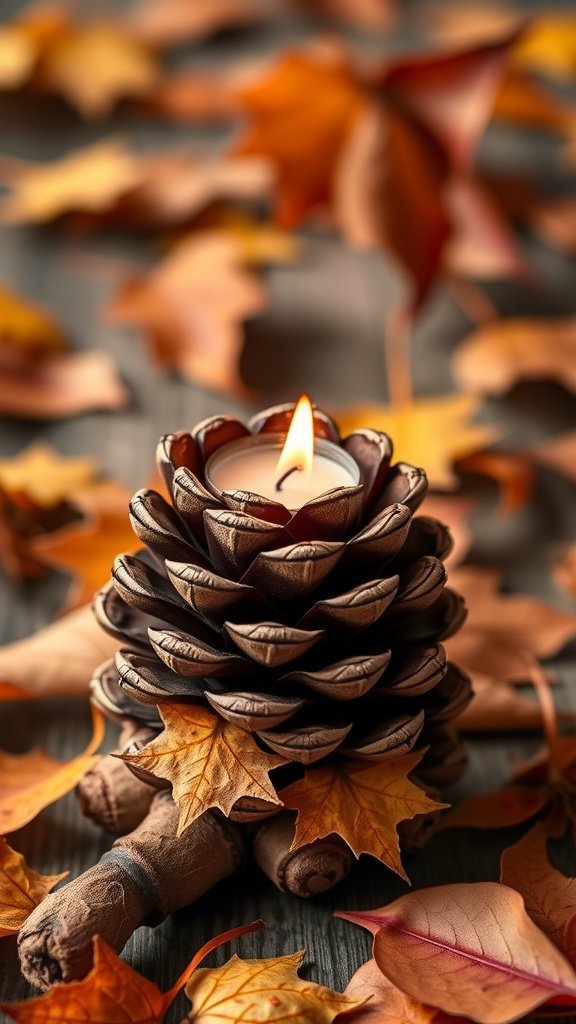
Pinecone candle holders are a charming way to bring a touch of nature indoors. They are perfect for cozy evenings or festive gatherings. This DIY project is simple and fun, making it a great activity for all ages.
To create your own pinecone candle holder, start by gathering a few pinecones. Look for ones that are large and open, as they will hold the candle better. You can find these in your backyard or at a local craft store.
Next, you’ll need a small candle or tealight. Place the candle inside the pinecone’s center. If it’s too loose, you can use a bit of hot glue to secure it. Make sure the candle is stable and won’t tip over.
For added flair, consider decorating around the base of the pinecone with autumn leaves or small twigs. This will enhance the natural look and make it a beautiful centerpiece.
Once everything is set, light the candle and enjoy the warm glow. This pinecone candle holder not only looks lovely but also brings a cozy feel to any space.
Cork Candle Holder

Cork candle holders are a fun and eco-friendly way to add a personal touch to your home decor. This simple design uses wine corks stacked to create a sturdy base for a candle. It’s perfect for those who love a rustic look or want to repurpose materials.
To make your own cork candle holder, start by gathering your materials. You’ll need a collection of wine corks, a hot glue gun, and a candle. If you want to add a bit of flair, consider painting the corks or wrapping them in twine.
Begin by stacking the corks in a circular formation. Use the hot glue to secure each cork in place as you build the tower. Make sure to leave a space at the top for your candle. Once you reach your desired height, let the glue dry completely.
Finally, place your candle in the holder and light it up. The warm glow will shine through the corks, creating a cozy atmosphere. This DIY project is not only easy but also a great conversation starter when you have guests over!
Wood Slice Candle Holder

Creating a wood slice candle holder is a fun and easy project that adds a rustic touch to any space. The image shows a simple yet charming candle holder made from a round slice of wood. It features a glass candle placed in the center, surrounded by natural elements like leaves and acorns, enhancing its earthy vibe.
To make your own wood slice candle holder, start by gathering your materials. You’ll need a wood slice, a glass candle holder, sandpaper, and optionally, wood finish or sealant for a polished look. Choose a wood slice that’s about an inch thick for stability.
Begin by sanding the edges of the wood slice to smooth out any rough spots. This step is important for safety and aesthetics. Once it’s smooth, you can apply a wood finish if you want to protect the wood and give it a nice shine. Let it dry completely.
Next, place the glass candle holder in the center of the wood slice. Make sure it sits securely. If you like, you can add decorative elements around the base, such as small stones or dried flowers, to enhance the look.
Finally, light your candle and enjoy the warm glow it brings to your space. This wood slice candle holder is perfect for cozy evenings or as a centerpiece for gatherings.
Recycled Plastic Bottle Candle Holder
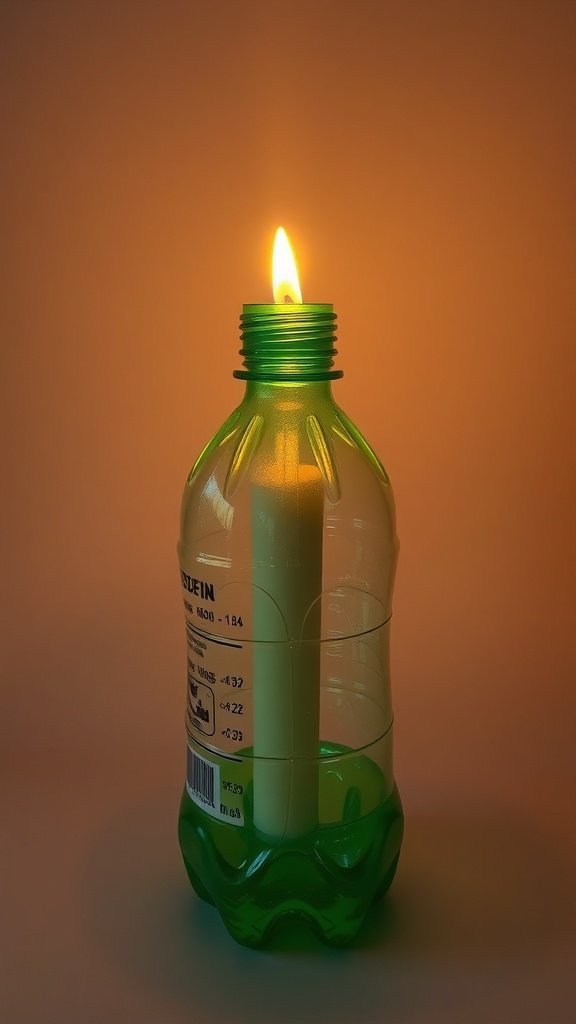
Creating a candle holder from a recycled plastic bottle is a fun and eco-friendly project. This simple idea not only helps reduce waste but also adds a unique touch to your home decor.
To make your own candle holder, start by gathering materials. You will need an empty plastic bottle, a candle, a pair of scissors, and some decorative items if you want to personalize it.
First, clean the plastic bottle thoroughly and remove any labels. Cut the bottle to your desired height, leaving enough space for the candle to fit securely. Make sure to cut it evenly for a neat look.
Next, place the candle inside the bottle. If the candle is too small, you can use some melted wax to secure it at the bottom. This will help keep it stable and prevent it from tipping over.
Now, it’s time to decorate! You can paint the bottle, wrap it with twine, or add stickers to give it a personal touch. Get creative and make it your own!
Finally, place your new candle holder in a safe spot, light the candle, and enjoy the warm glow it brings to your space. This project is not only easy but also a great way to repurpose materials you already have at home.
Eggshell Candle Holder
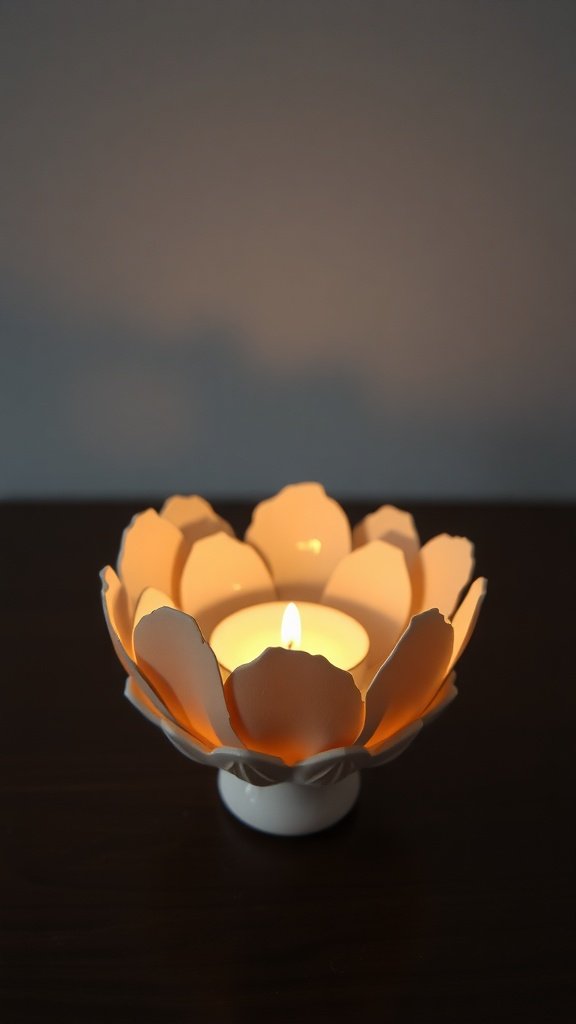
Creating an eggshell candle holder is a fun and eco-friendly project. This unique design not only looks beautiful but also gives a new life to eggshells that would otherwise be thrown away.
To start, gather your materials. You will need empty eggshells, a small candle or tealight, and some paint or decorative materials if you want to add a personal touch. Make sure to clean the eggshells thoroughly and let them dry.
Next, carefully cut the eggshells in half. You can use a small knife or scissors for this. Be gentle to avoid breaking them. Once you have your two halves, you can paint them or leave them natural. If you choose to paint, let the paint dry completely.
Now, take a small dish or base to hold the eggshells. Arrange the eggshell halves around the dish, creating a flower-like shape. You can glue them in place for added stability. Place the candle in the center of the dish, and you’re all set!
When you light the candle, the soft glow will shine through the eggshells, creating a lovely effect. This eggshell candle holder is perfect for parties, home decor, or even as a thoughtful gift.
Bottle Cap Candle Holder
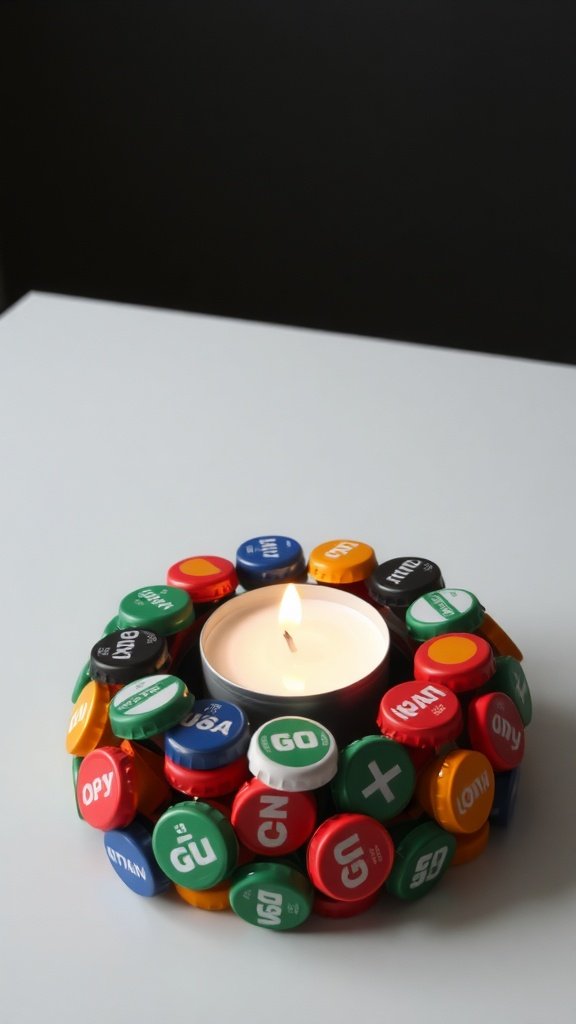
Creating a bottle cap candle holder is a fun and eco-friendly project. It’s a great way to repurpose those caps that usually end up in the trash. The vibrant colors and playful designs of the caps add a unique touch to your decor.
To make your own bottle cap candle holder, gather your materials. You’ll need a variety of bottle caps, a small candle or tealight, and a sturdy base like cardboard or a small plate. Start by arranging the bottle caps in a circular pattern around the candle. Make sure they are close enough to hold the candle securely.
Once you have your design, use a hot glue gun to attach the caps to the base. Apply glue to the edge of each cap and press it firmly onto the base. Continue until the entire circle is filled. Allow the glue to dry completely before placing the candle in the center.
Light the candle and enjoy the warm glow. This DIY project not only brightens up your space but also showcases your creativity. Plus, it’s a great conversation starter!