DIY fabric wall art projects offer a creative and accessible way to transform any room with texture and color. Whether you’re a seasoned crafter or just starting, fabric wall art projects provide endless opportunities to personalize your space.
Table of Contents
From simple designs to more intricate patterns, these 21 DIY fabric wall art projects inspire artistic expression and bring warmth to your walls. I remember my first fabric wall hanging—it added such a unique touch to my living room, sparking my love for fabric-based decor.
Let these projects guide you to create your own beautiful fabric wall art.
Create a Colorful Fabric Collage Wall Hanging

A fabric collage wall hanging combines different fabric scraps to form an eye-catching piece of art. This project allows you to mix patterns, textures, and colors to suit your style.
The collage can be framed or mounted on a wooden dowel for a boho-chic look. It’s a fun way to repurpose leftover fabrics and make a bold statement on your wall.
Steps:
- Gather various fabric scraps with complementary colors and patterns.
- Cut them into different shapes like squares, triangles, or abstract forms.
- Arrange the pieces on a base fabric or canvas to create a pleasing composition.
- Sew or glue the fabric pieces onto the base.
- Attach the finished collage to a wooden dowel or frame.
- Hang it on your wall using a string or hooks.
Design Geometric Fabric Panels for Modern Walls

Geometric fabric panels bring a sleek and modern vibe to any room. Using bold shapes like triangles, rectangles, or chevrons, you can create symmetrical or abstract patterns.
These panels can be stretched on wooden frames or simply mounted on corkboards. Their clean lines and contrasting fabrics make them a stylish focal point that elevates your wall decor.
Steps:
- Choose fabrics in contrasting colors or textures.
- Cut fabric into geometric shapes of equal size.
- Arrange the shapes into a pattern on a wooden frame or corkboard.
- Attach the fabric pieces securely using glue or staples.
- Wrap edges neatly around the frame for a polished look.
- Hang the panels evenly spaced on your wall.
Make a Fabric Tassel Wall Hanging for Texture

Fabric tassel wall hangings add a playful and tactile element to your decor. Using strips of fabric, you can create layers of tassels that cascade beautifully on a wooden dowel or branch.
This project is perfect for beginners and offers a cozy, handcrafted feel that brightens any space with movement and softness.
Steps:
- Cut strips of fabric into equal lengths.
- Fold each strip in half and tie or loop them around a wooden dowel.
- Continue attaching tassels closely to cover the dowel.
- Trim tassels to even lengths if desired.
- Add a string to the dowel for hanging.
- Mount the tassel wall hanging on your wall.
Craft Fabric-Covered Canvas Art for a Custom Look

Fabric-covered canvas art transforms simple canvases into personalized wall decor. By wrapping fabric around the canvas frame or gluing fabric to the front, you achieve a seamless, textured look.
This project allows you to showcase beautiful fabric prints or textures as standalone art pieces, perfect for coordinating with your room’s color palette.
Steps:
- Select a canvas and fabric with your desired pattern.
- Cut the fabric slightly larger than the canvas size.
- Lay the fabric flat and place the canvas on top.
- Wrap fabric edges around the back of the canvas and staple or glue them.
- Ensure the fabric is taut and smooth on the front.
- Hang your fabric-covered canvas art on the wall.
Design a Patchwork Quilt Wall Display

Using small fabric squares sewn together, a patchwork quilt wall display turns traditional quilting into wall art. This project highlights fabric patterns and colors in a unified piece that adds warmth and charm.
You can customize the size and shape, making it a meaningful statement piece or a soft backdrop for your room.
Steps:
- Choose coordinating fabric squares in various patterns.
- Arrange the squares in a pleasing grid or design.
- Sew the squares together carefully along edges.
- Add backing fabric and quilt layers if desired.
- Attach hanging loops or a sleeve to the back.
- Hang the patchwork quilt securely on your wall.
Create Fabric Flower Wall Art for a Three-Dimensional Effect
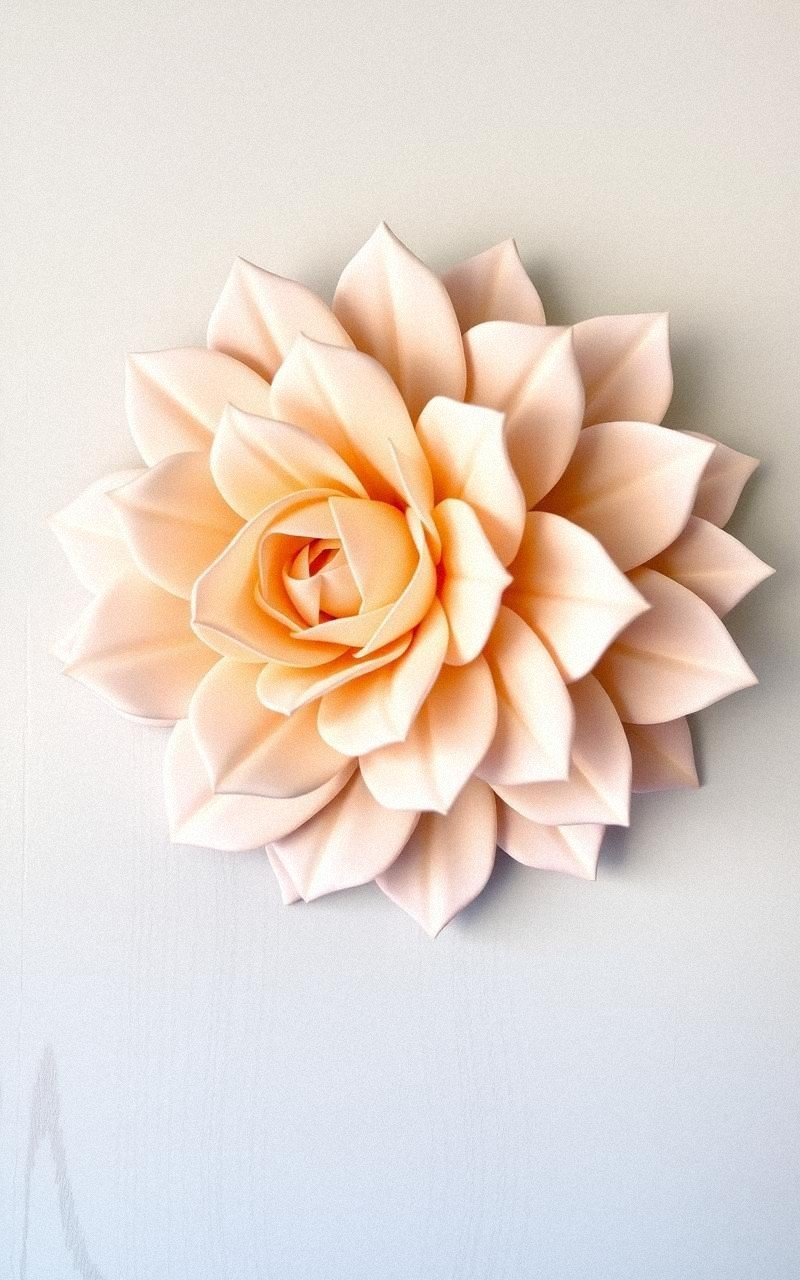
Fabric flower wall art brings a soft, sculptural touch to your space. By crafting flowers from fabric petals and layering them, you produce a 3D effect that adds depth to your walls.
This project invites creativity with different fabric types and colors, perfect for a feminine or nature-inspired room theme.
Steps:
- Cut petal shapes from fabric in various sizes.
- Layer and glue or sew petals together to form flowers.
- Add fabric leaves or stems if desired.
- Arrange flowers on a canvas or frame.
- Secure flowers with glue or stitching.
- Mount the finished piece on your wall.
Assemble a Boho Macramé and Fabric Wall Hanging

Mixing macramé knots with fabric strips creates a boho-style wall hanging full of texture and charm. This project blends natural fibers with colorful fabric to produce a relaxed, artistic vibe.
It’s ideal for adding personality and a handmade feel to living rooms or bedrooms.
Steps:
- Select macramé cords and strips of fabric in coordinating colors.
- Create basic macramé knots on a wooden dowel.
- Incorporate fabric strips between knots for contrast.
- Continue until the desired size is reached.
- Trim ends evenly or create fringe effects.
- Hang your boho wall hanging with a string.
Frame Vintage Fabric to Create Nostalgic Wall Decor

Framing vintage fabric pieces turns treasured textiles into cherished wall art. Whether it’s heirloom lace, embroidered cloth, or retro prints, this project preserves fabric history beautifully.
Displaying vintage fabric in frames adds a nostalgic and sophisticated touch to your walls.
Steps:
- Find vintage or antique fabric pieces you want to display.
- Cut fabric to fit the frame size.
- Stretch fabric over backing or mount it flat.
- Place fabric inside a clean frame with glass.
- Secure backing tightly to keep fabric in place.
- Hang the framed fabric art on your wall.
Weave Fabric Strips Into a Textured Wall Tapestry

Weaving fabric strips on a simple loom or frame creates a unique tapestry with rich texture. This hands-on project allows for experimenting with colors and weaving patterns, resulting in a tactile and dynamic piece of wall art.
The woven tapestry adds an artisanal feel wherever it’s displayed.
Steps:
- Set up a basic loom or frame for weaving.
- Cut fabric into long strips of various colors and textures.
- Weave fabric strips over and under the loom threads.
- Alternate colors and widths for visual interest.
- Finish edges by tying or securing strands.
- Hang the woven tapestry on your wall.
Use Embroidery Hoops to Display Fabric Art

Embroidery hoops make charming frames for fabric art, highlighting patterns or hand-stitched designs. This project is easy to customize by mixing fabrics, embroideries, and sizes.
Arranging multiple hoops on a wall creates an attractive gallery that’s both cozy and creative.
Steps:
- Select embroidery hoops of various sizes.
- Choose fabric pieces or embroider your designs.
- Stretch fabric tightly in each hoop and tighten the screw.
- Trim excess fabric neatly at the back.
- Group hoops in an appealing layout on your wall.
- Hang hoops securely with nails or hooks.
Make a Minimalist Fabric Frame for Modern Aesthetics
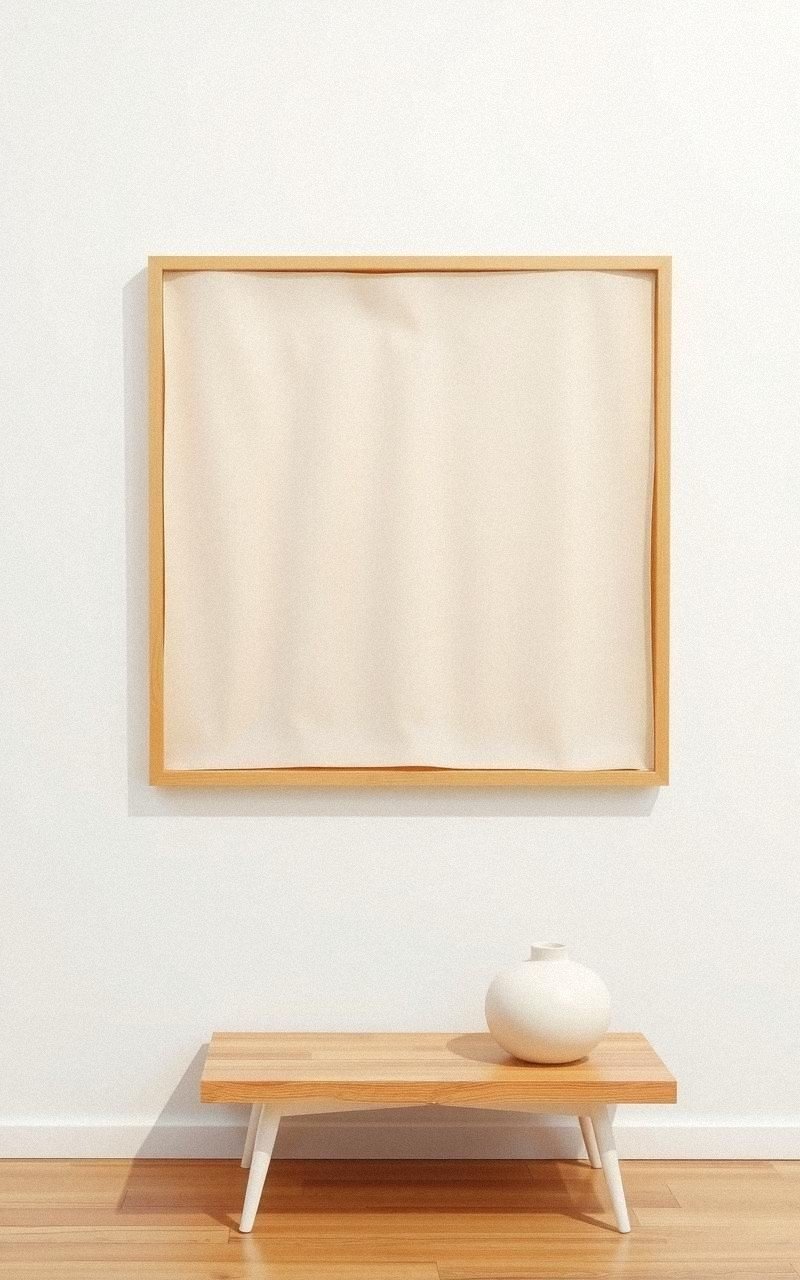
A minimalist fabric frame focuses on simplicity and clean lines, emphasizing texture over embellishment. Stretch a neutral or softly patterned fabric over a slim wooden frame to create understated wall art.
This project suits modern interiors seeking subtle fabric accents without overwhelming the space.
Steps:
- Choose a simple wooden frame and subtle fabric.
- Cut fabric slightly larger than the frame.
- Wrap fabric around the frame edges and staple or glue at the back.
- Ensure fabric is taut and smooth on the front.
- Optionally add a small label or tag for detail.
- Hang the fabric frame in your desired room.
Construct a Fabric-Covered Corkboard for Functional Art

A fabric-covered corkboard combines style with utility. Covering your corkboard with a favorite fabric enhances its appearance while providing a pin-friendly surface for notes or photos.
This project turns an ordinary office or kitchen board into a decorative wall piece.
Steps:
- Select a corkboard and fabric with a pattern you like.
- Cut fabric larger than the corkboard dimensions.
- Stretch fabric over the corkboard and staple on the back.
- Trim any excess fabric neatly.
- Optionally add decorative push pins.
- Mount your fabric-covered corkboard on the wall.
Design Abstract Fabric Shapes on a Neutral Background
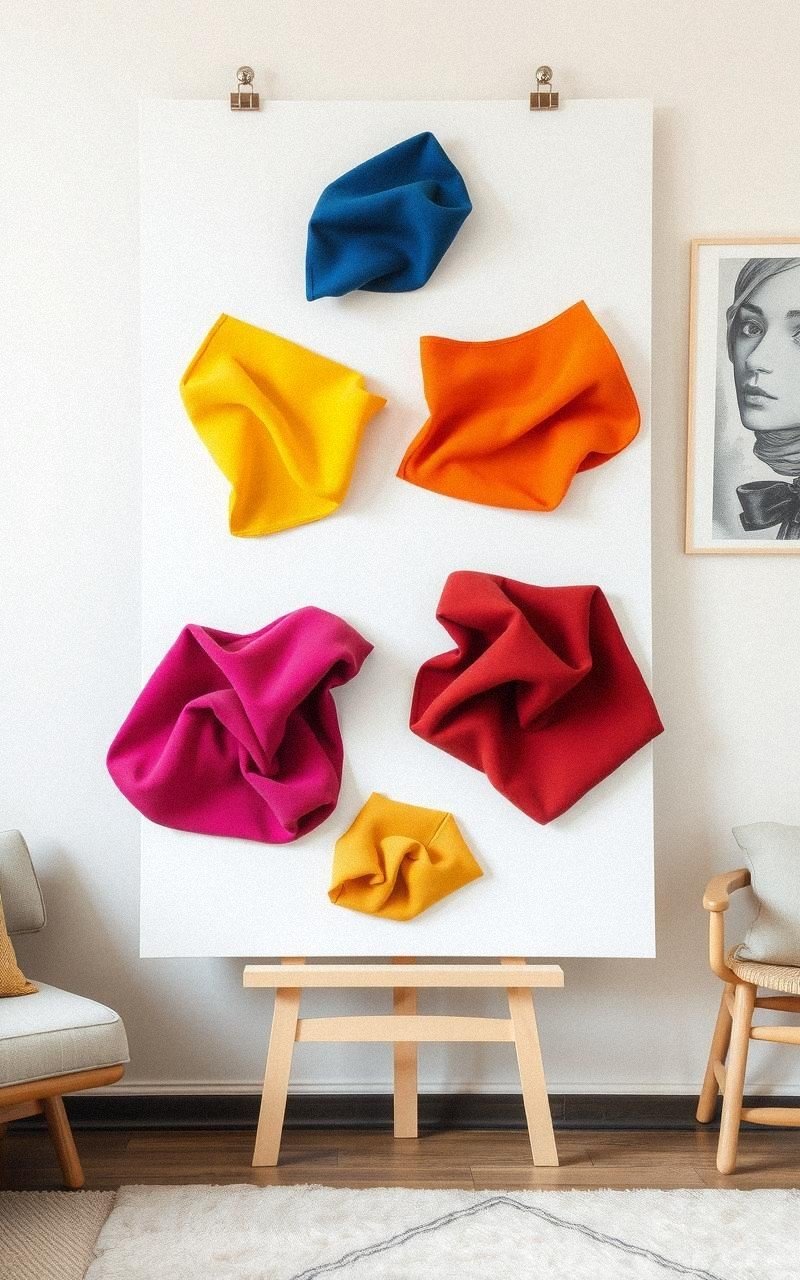
Abstract fabric shapes create modern, artistic wall art with a focus on form and color contrast. Cut irregular shapes from bold or textured fabrics and mount them on a plain canvas or board.
This project offers freedom to experiment with composition and adds visual intrigue to your walls.
Steps:
- Pick fabrics with striking colors or textures.
- Cut fabric into abstract, irregular shapes.
- Arrange shapes on a neutral canvas or board.
- Glue or sew shapes in place.
- Allow glue to dry completely.
- Hang your abstract fabric art on the wall.
Sew Fabric Pocket Wall Organizers for Functional Decor

Fabric pocket wall organizers offer practical storage while adding texture and color to walls. Using sewn fabric pockets attached to a backing, this project helps organize small items like mail, keys, or stationery.
It’s a stylish solution for entryways, offices, or craft rooms.
Steps:
- Select durable fabric for pockets and backing.
- Cut fabric pieces into pocket shapes.
- Sew pocket edges and attach them to backing fabric.
- Add decorative stitching or labels if desired.
- Attach loops or hooks for wall hanging.
- Mount the organizer on your wall near your workspace.
Create a Fabric-Wrapped Branch Wall Sculpture

Wrapping natural branches with fabric transforms organic materials into sculptural wall art. This project mixes rustic and soft textures, bringing nature indoors with creative flair.
It’s a great way to use interesting branches and fabric scraps for a unique wall display.
Steps:
- Collect clean, dry branches with interesting shapes.
- Cut fabric strips to wrap around the branches.
- Wrap and secure fabric tightly around each branch.
- Arrange branches artistically on a backing board or directly on the wall.
- Attach branches securely using hooks or adhesive strips.
- Step back and enjoy your fabric-wrapped branch sculpture.
Design Fabric-Covered Letters for Personalized Decor

Fabric-covered letters add a personal touch to any room, spelling out names or words with texture and color. Using cardboard or wooden letters wrapped in fabric, this project creates charming wall elements that reflect your style.
Perfect for nurseries, living rooms, or offices.
Steps:
- Choose letters made of cardboard or wood.
- Select fabric that complements your room’s palette.
- Cut fabric to cover each letter fully.
- Wrap and glue fabric around letters, smoothing wrinkles.
- Allow glue to dry completely.
- Arrange and hang letters on your wall.
Assemble a Fabric and Button Mixed Media Art Piece
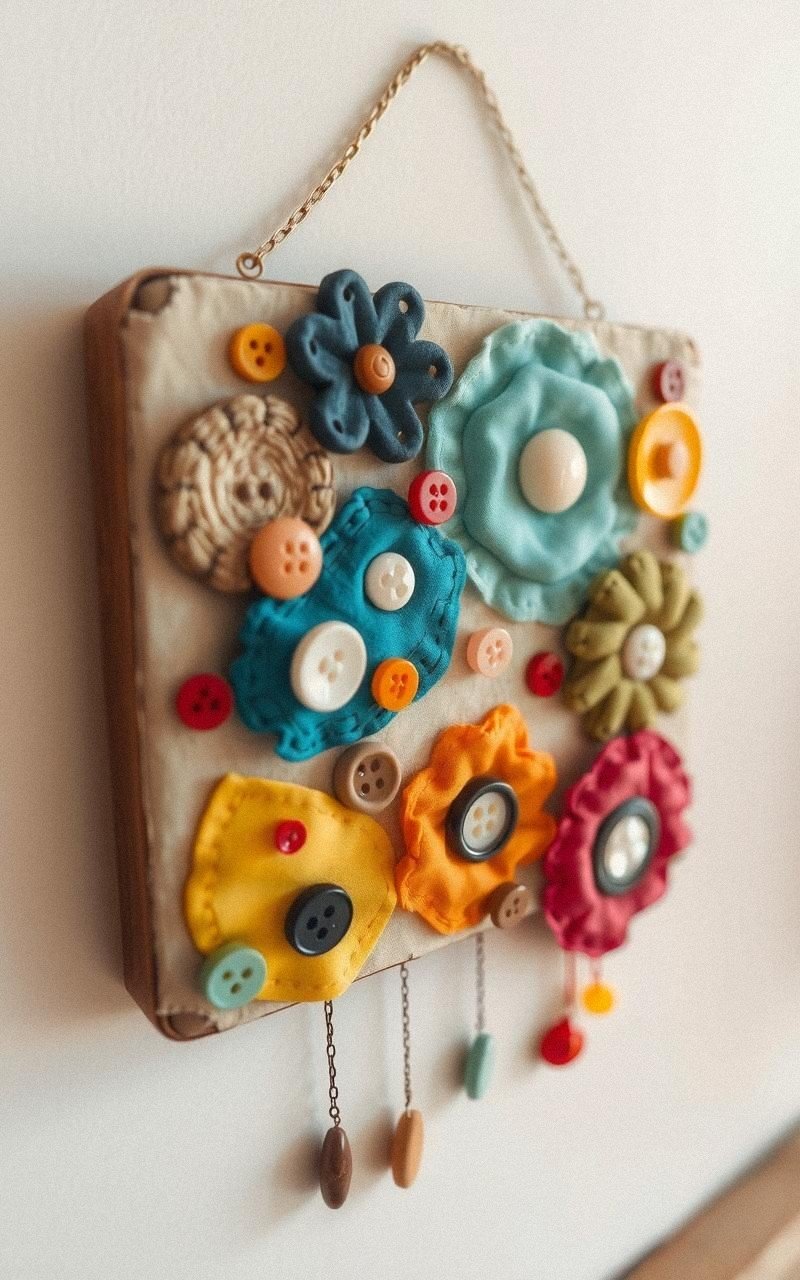
Combining fabric with buttons creates charming mixed media wall art full of texture and detail. This playful project allows you to arrange fabric shapes and button accents into scenes or abstract designs.
The result is a tactile and whimsical decoration that invites closer inspection.
Steps:
- Cut fabric into shapes for your design.
- Plan button placement for added detail.
- Glue fabric shapes onto a canvas or board.
- Attach buttons using strong glue or sewing.
- Let all elements dry and set firmly.
- Hang your mixed media fabric and button art.
Construct a Fabric Mobile for a Dynamic Wall Accent

A fabric mobile adds movement and softness as a wall or ceiling accent. Using lightweight fabric shapes suspended from a frame or hoop, this project creates a gentle kinetic sculpture.
It’s ideal for nurseries, bedrooms, or creative spaces seeking a soothing visual element.
Steps:
- Cut lightweight fabric into shapes like leaves or circles.
- Attach fabric shapes to varying lengths of string.
- Tie strings to a wooden hoop or frame evenly.
- Balance the mobile for smooth movement.
- Secure a hanging loop to the frame.
- Suspend the mobile from the ceiling or wall hook.
Create a Framed Fabric Mandala for Intricate Wall Art

Fabric mandalas combine colorful fabric pieces arranged in circular, symmetrical patterns. Framing your mandala fabric art highlights its detailed design and vibrant hues.
This project offers a mesmerizing focal point that adds cultural and artistic flair to your wall.
Steps:
- Cut fabric into shapes needed for your mandala design.
- Arrange pieces symmetrically on a circular base.
- Glue or sew fabric pieces in place.
- Stretch the completed mandala fabric onto a frame.
- Secure edges neatly at the back.
- Hang the framed mandala prominently on your wall.
Make a Fabric Fringe Wall Hanging for Bohemian Charm

Fabric fringe wall hangings feature layered strips or yarns creating a flowing, textured art piece. This bohemian-inspired project uses simple cutting and attaching techniques to form a relaxed, inviting wall decoration.
It adds softness and casual style to any room.
Steps:
- Cut long strips of fabric or yarn.
- Attach strips to a wooden dowel or rod in layers.
- Vary lengths for a dynamic fringe effect.
- Tie a string to the dowel for hanging.
- Trim ends evenly or leave uneven for style.
- Hang your fabric fringe wall art on the wall.
Design a Fabric Origami Wall Display

Fabric origami wall art folds fabric into geometric or floral shapes that are mounted on a board or canvas. This project combines sewing or pressing techniques to create structured, sculptural pieces.
Fabric origami adds an unexpected, artistic dimension to your wall decor.
Steps:
- Choose stiff or lightly starched fabric.
- Fold fabric into origami shapes like cranes or flowers.
- Secure folds with glue or stitches.
- Arrange fabric origami pieces on a canvas or board.
- Attach pieces firmly with glue.
- Mount the finished display on your wall.