Terracotta Pot Painting Ideas turn plain clay planters into cheerful accents. With terracotta pot painting, even the smallest windowsill feels brighter, and painted terracotta pots bring character to kitchens, patios, and desks.
Table of Contents
I keep a row of painted clay pots by the sink; their colors have become my morning pick‑me‑up.
These Terracotta Pot Painting Ideas grew from weekend tinkering into a habit of gifting tiny gardens. When a new terracotta planter arrives, patterns start swirling: ombré sunsets, citrus motifs, tiled blues.
Painted terracotta pots keep memories on display and make herbs and succulents look like they belong in a story.
Sun-Kissed Lemon Motif On Terracotta Herb Planters
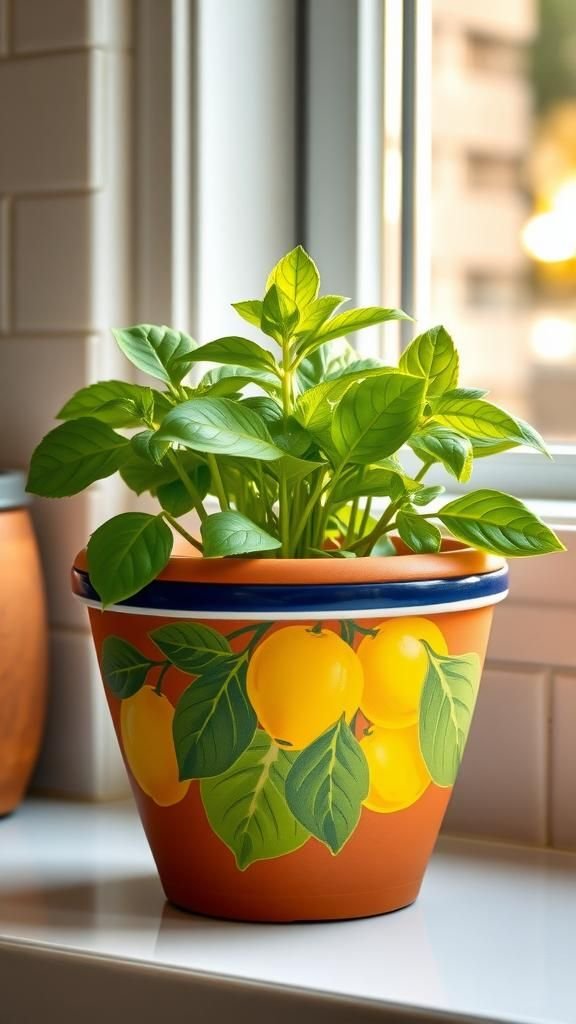
A lemon motif brings an instant Mediterranean mood to terracotta, balancing sunny citrus tones with glossy leaf greens. Soft butter yellows layered with pale highlights feel fresh beside the warm clay body, while a navy or cobalt rim references café ceramics.
Acrylic paints and paint pens suit the clean outlines and delicate seeds. Herb planters such as basil and rosemary amplify the theme and release aroma near a window.
A matte varnish keeps the surface chalky, or a satin finish adds kitchen-friendly wipeability. Wrapped with twine and a sprig of thyme, it becomes a charming housewarming present.
Steps
- Wash and prime the pot, allowing the surface to dry completely.
- Lightly sketch lemons and leaves, planning clusters around the body.
- Block in yellows and greens, layer highlights and shadows, then outline with a paint pen.
- Add a thin cobalt rim stripe and small seed dots; finish with a protective sealer.
Modern Color-Blocked Geometry With Crisp Tape Lines

Color-blocking turns a humble pot into a gallery-ready accent, especially in saturated brights or muted neutrals. Angled panels, diagonal bands, and intersecting shapes feel modern against raw terracotta edges.
A palette of blush, rust, mustard, sage, and charcoal suits mid-century furniture, while monochrome black and white leans minimalist. Acrylics deliver solid coverage and smooth fields of color, and narrow tape lines give sharp separations.
A matte finish keeps it architectural; gloss reads playful. Stacked on a console or grouped in threes, these pots frame snake plants or rubber plants and make a sleek gift for new apartments.
Steps
- Prime the pot if a solid backdrop is desired, letting it dry fully.
- Mask geometric panels with painter’s tape, pressing edges firmly.
- Fill shapes with acrylic color in thin coats; remove tape while tacky.
- Refine edges with a detail brush and seal for durability.
Soft Ombre Sunset Fade Around The Rim

An ombre fade suggests evening skies over warm clay, shifting from coral through apricot to pale peach. The gradient looks dreamy beside desert plants and gentle grasses, with the terracotta base showing to ground the effect.
Translucent layers of acrylic, thinned slightly, help the colors blend where they meet. A satin or eggshell varnish adds a faint glow, reminiscent of sunset light.
Hues can swing toward lilac and rose for a cooler twilight version. Clustered on a balcony rail, these planters read calm and airy and lend themselves to gifting with trailing string-of-pearls or soft silver dichondra.
Steps
- Prime the rim area lightly to smooth the surface.
- Blend three adjacent sunset hues, working from darkest at the top to lightest below.
- Feather the transitions with a damp brush for a seamless fade.
- Allow to dry and coat with a low-sheen sealer.
Delicate White Mandala On Burnished Clay

Fine white lines swirling across warm terracotta bring a meditative quality that suits quiet corners and yoga nooks. Paint pens or liner brushes trace petals, dots, and arcs that radiate from a central rosette.
The contrast of chalky white against burnished clay feels both ornate and serene. A clear matte coat preserves the hand-drawn texture without glare.
One large focal mandala enhances a single pot, while a series of smaller motifs wraps a trio. For color variation, pale turquoise or gold dot accents can sparkle lightly.
Presented with a lavender plant, it becomes a soothing, thoughtful gesture.
Steps
- Lightly pencil a central guide on the pot’s face.
- Draw mandala lines and dots with a white paint pen or liner brush.
- Deepen details once dry, ensuring balanced spacing.
- Seal with a matte varnish to protect the delicate pattern.
Indigo Moroccan Tile Pattern For Patio Pots

A tile-inspired pattern in layered indigos evokes courtyards, fountains, and cool shade. Repeating quatrefoils, stars, and latticework decorate the pot in alternating dark and light blues, with tiny white accents to mimic glaze pooling.
The scheme pairs with terracotta’s warmth for balance and works beautifully outdoors next to mosaic tables. Acrylics with a hint of glazing medium give a ceramic look, while a weather-resistant topcoat supports patio living.
A grouping of three with varying scales of pattern creates rhythm. Gifting with mint or jasmine hints at tea rituals and summer evenings, making an easy patio centerpiece.
Steps
- Sketch a repeating grid lightly around the pot.
- Fill shapes with layered indigo tones, leaving thin white lines as grout.
- Add small white dots and highlights to suggest shine.
- Finish with an exterior-grade sealer for outdoor display.
Speckled Terrazzo Finish With Pastel Chips

Terrazzo speckles bring playful texture to curved clay. Tiny chips in mint, blush, buttercream, and slate scatter over a creamy base, with irregular shapes that feel handcrafted.
The look suits Scandinavian interiors with pale woods and linen, while still cozy on a desk beside stationery. Acrylics and a splatter technique form organic flecks; a smooth satin coat adds a ceramic vibe.
For variation, darker bases with neon specks read bold and fun. A trio in ascending sizes, each with different chip densities, turns a shelf into a subtle statement.
Gifted with succulents, it charms design-loving friends.
Steps
- Lay down a light base coat over the pot and let dry.
- Dab irregular pastel chips using a small brush; vary sizes and angles.
- Add tiny contrasting flecks to deepen the terrazzo look.
- Seal with a satin finish for a smooth, wipeable surface.
Chalkboard Label Bands For Kitchen Herbs
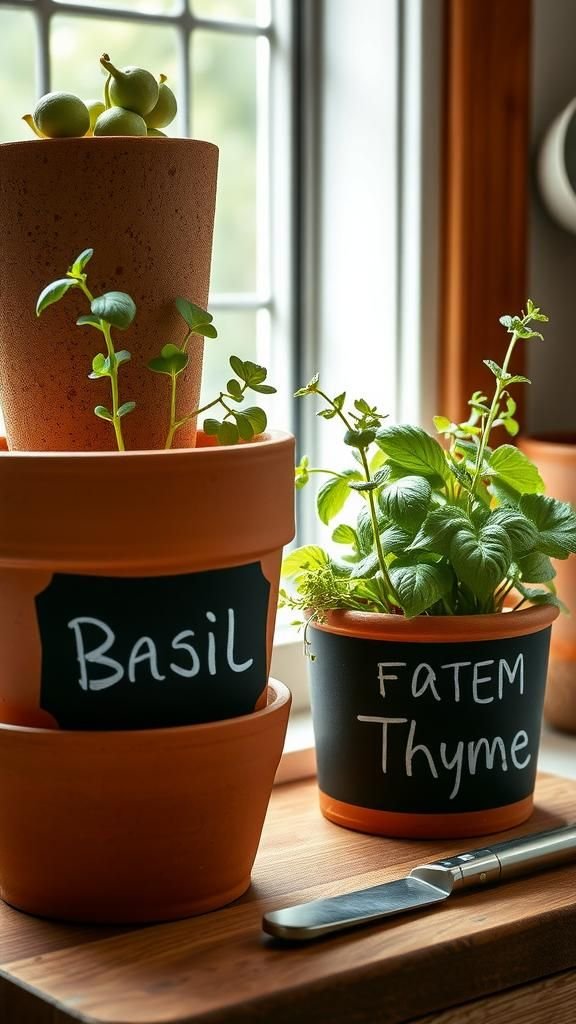
A chalkboard band around terracotta adds function without losing warmth. Deep charcoal panels wrap the middle or rim, framed by raw clay edges, and white chalk or chalk pen lettering identifies basil, thyme, or oregano.
The look feels homely in a kitchen, especially beside wooden spoons and linen towels. A black-matte paint designed for chalk writing gives the right texture, while a clear coat on the clay portions keeps the contrast.
Clustered near a window, these pots encourage rotating plants and seasonal notes. As a gift, include a chalk marker and a bundle of clipped herbs.
Steps
- Mask a clean band around the pot with tape.
- Apply chalkboard paint in even coats and let cure.
- Remove tape, letter the herb name once dry, and clean up edges.
- Protect raw clay with a light sealer, leaving the band writable.
Watercolor Eucalyptus And Fern Botanical Silhouettes
Soft botanical silhouettes in muted greens bring a watercolor hush to terracotta. Eucalyptus rounds, fern fronds, and delicate stems drift across the surface in layered translucency.
Thinned acrylics or gouache achieve gentle gradients, with darker edges pooling at leaf tips. The palette leans toward sage, olive, and blue-green, with occasional pale ochre veins.
A matte finish preserves the paper-like quality. Placed near linen curtains and stoneware, the pot becomes a quiet presence.
With a gift tag pressed from plant paper and a small fern tucked in, it offers an understated nod to nature lovers.
Steps
- Prime lightly for a smoother painting surface.
- Lay pale green leaf shapes, keeping edges soft and translucent.
- Layer deeper tones for dimension and subtle veins.
- Allow to dry thoroughly and seal with a matte varnish.
Minimal Line Art Faces In Monochrome

Continuous black lines wandering over terracotta feel chic and witty, especially when they suggest faces or profiles. A fine paint pen or liner brush achieves the fluid stroke, with occasional thicker accents for eyelashes or curls.
The clay’s warmth offsets the stark monochrome for a balanced look that suits bookshelves and artful desks. A clear matte coat preserves the line quality and prevents smudging.
For variation, creamy off-white base coats transform the pot into a canvas. Gifted with a sculptural ZZ plant or rubber plant, this design satisfies lovers of art prints and gallery moods.
Steps
- Prepare a smooth base if desired and let dry.
- Sketch light pencil guides or practice lines on paper.
- Draw flowing facial lines in black, keeping strokes confident.
- Set the ink and protect with a matte clear coat.
Rustic Whitewash Farmhouse With Peeking Clay
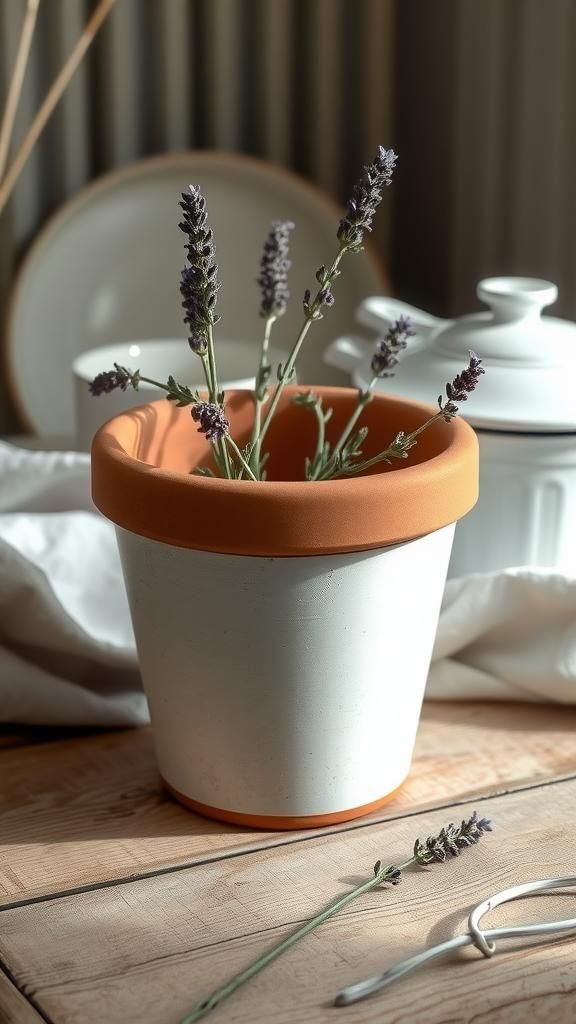
A chalky whitewash softens terracotta without hiding its earthy tone. Light coverage lets the clay peek through, lending a weathered farmhouse feel that complements cotton towels, wicker baskets, and galvanized trays.
Brushstrokes remain visible for charm, while the rim stays raw for contrast. Chalk-style paints add a velvety texture; distressing can appear naturally where the pot curves.
A light wax or matte sealer maintains the chalk look. Tucked beside enamelware and lavender, it evokes cottage kitchens.
Tied with linen ribbon and paired with a thyme plant, it travels well as a thoughtful hostess surprise.
Steps
- Wipe the pot clean and apply a thinned white coat.
- Feather the paint so clay shows through on edges and ridges.
- Let dry fully, touch up sparse areas if needed.
- Finish with a matte sealer or clear wax.
Starry Galaxy Night With Subtle Metallic Dust

A night-sky finish transforms terracotta into a little cosmos. Deep navy and black blend across the surface, punctuated by spattered star fields and faint nebula swirls in purple and teal.
Tiny metallic flecks glint like distant constellations, especially under lamplight. Gloss or semi-gloss varnish enhances depth, while the warm rim kept bare nods to the pot’s origin.
Paired with trailing pothos or moon cacti, it reads whimsical and celestial. Presented with a star chart tag, it becomes a memorable gift for stargazers and late-night readers.
Steps
- Lay a dark base in navy and black, blending softly.
- Spatter white paint for stars and swirl faint nebula hues.
- Tap on fine metallic flecks for sparkle.
- Apply a gloss sealer to deepen the night-sky effect.
Cottagecore Meadow Wildflowers In Gentle Pastels

Tiny daisies, buttercups, and clover dotting terracotta create a meadow effect that feels handpicked. Pastel petals with soft yellow centers sit on slender stems, while a few sprigs of baby’s breath fill negative space.
The palette leans airy and springlike, best with matte acrylics and a small round brush or paint pens for dots. Terracotta warmth enhances the floral sweetness without pushing it saccharine.
A clear matte finish keeps it soft. Arranged with a gingham cloth and a pot of chamomile, this design suits windowsills, tea carts, and letter-writing desks, and makes a gentle thank-you present.
Steps
- Mark loose clusters for flowers and stems lightly.
- Dot centers, add petals in pastels, then fine stems and leaves.
- Scatter baby’s breath dots to fill gaps.
- Dry thoroughly and seal with a matte coat.
Southwestern Desert Stripes And Warm Earth Tones
Sun-baked stripes wrap terracotta in sienna, adobe, sand, and turquoise accents, echoing woven blankets and canyon horizons. Bands of varying widths rise from the base to the rim, with occasional chevrons or simple arrows for rhythm.
Pigments in rust and ochre harmonize with cacti and agaves, while a touch of turquoise sparks contrast. A satin finish gives a durable sheen that suits patios and window ledges.
Grouped with gravel trays and river stones, the look feels grounded. Bundled with a small cactus and a handwritten care note, it becomes a desert-themed gift.
Steps
- Mark guide lines for stripes around the pot.
- Fill bands with earth-tone acrylics and a pop of turquoise.
- Add simple chevrons or arrows for interest.
- Seal with a satin coat for gentle sheen.
Delft Blue Floral Scrolls On Terracotta
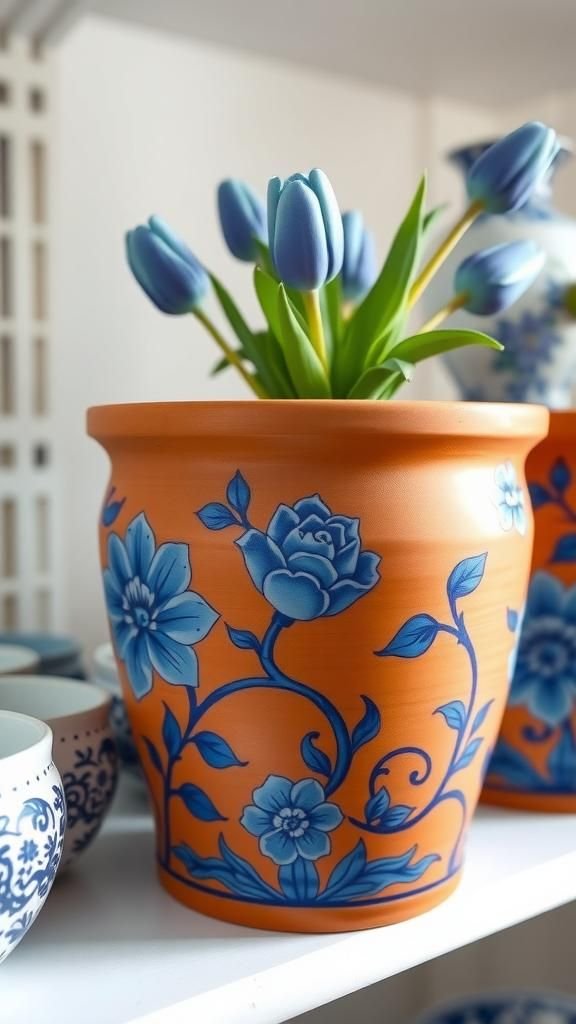
Delft blue florals feel timeless against terracotta’s orange warmth. Cobalt and ultramarine scrolls sweep around petals, tulips, and tiny berries, with darker edges and paler washes inside the shapes.
The result reads like hand-painted pottery while keeping the pot’s rustic base. A satin or semi-gloss topcoat adds a glazed impression.
This style complements white kitchens and airy shelves, shining beside porcelain pitchers. Presented with white hyacinths or paperwhites, it becomes a classic seasonal gift that echoes heirloom ceramics without feeling precious.
Steps
- Sketch loose floral placements and scroll paths.
- Paint blooms and leaves in layered blues with soft inner washes.
- Outline curls and add dot clusters for balance.
- Protect the design with a satin or semi-gloss sealer.
Metallic Rim And Foil Flecks Luxe Accent

A metallic rim elevates terracotta with understated glamour. Brushed gold or warm brass along the lip catches light, while scattered foil flecks below feel celebratory.
The body may remain natural or sit over a muted base such as mushroom or stone. Metallic acrylics and adhesive foil deliver sparkle, and a clear gloss enhances reflectivity.
Styled on a bar cart or coffee table, the pot doubles as a holder for rosemary topiaries or even wooden stirrers for parties. Wrapped with black tissue and a ribbon, it becomes a chic hostess gesture.
Steps
- Clean the rim and apply metallic paint in thin, even layers.
- Speckle adhesive where flecks will sit and press on foil pieces.
- Lightly burnish and remove excess for scattered shine.
- Finish with a gloss sealer to lock in metallic details.
Matisse-Inspired Organic Cutout Shapes In Color

Playful biomorphic forms, echoing paper cutouts, dance across terracotta in saturated tones. Leafy blobs, coral-like branches, and rounded petals overlap in ultramarine, coral, mustard, and jade.
The shapes appear hand-cut and spontaneous, with slight gaps showing the clay for breathing room. Flat acrylic color keeps the look graphic; a matte or eggshell topcoat suits the modern art vibe.
Near stacked art books or a bright rug, the planter reads lively and creative. Paired with a philodendron or monstera, it makes a spirited gift for color lovers.
Steps
- Lightly pencil organic shapes, planning overlaps.
- Fill each form with flat color, keeping edges clean.
- Layer a few accents on top for depth.
- Seal with a low-sheen varnish to preserve the graphic finish.
Cheerful Checkerboard Gingham In Picnic Hues
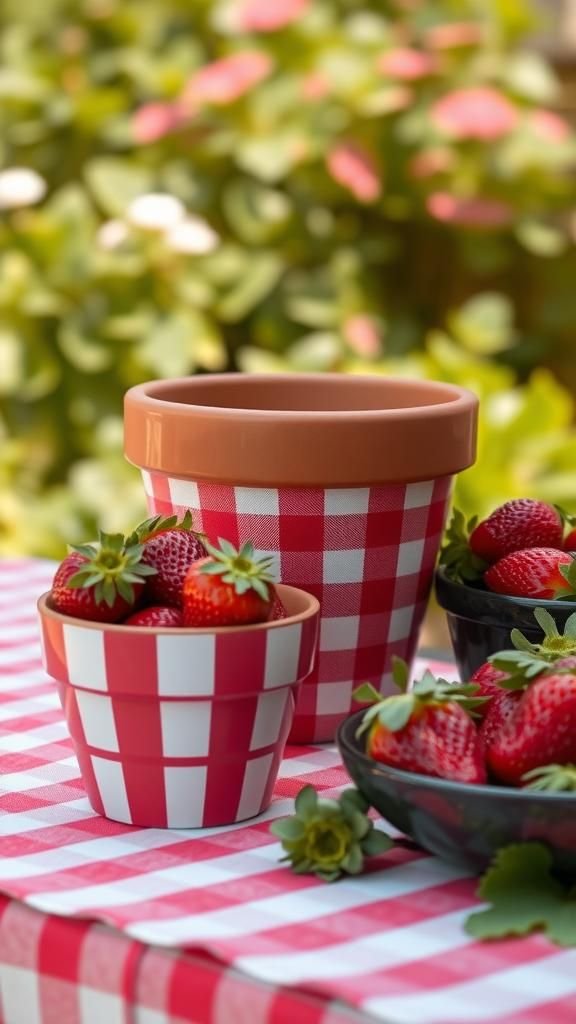
Checkerboard squares in cherry red, sky blue, or grassy green bring picnic energy to a planter. Alternating light and mid tones give that woven-gingham impression, especially when tiny intersecting lines soften the edges.
The pattern suits country kitchens and patios with striped umbrellas. Acrylics with a steady hand achieve tidy grids; a gloss coat brightens the colors like enamelware.
Pairing with strawberries in a bowl and a potted strawberry plant feels delightfully on-theme. Wrapped with a tea towel and recipe card, it becomes a sweet summertime present.
Steps
- Map a light pencil grid around the pot.
- Fill alternating squares with color, leaving pale ones for contrast.
- Add faint crosshatch lines to suggest fabric texture.
- Dry and seal with a glossy topcoat for a picnic shine.
Stenciled Herb Names With Laurel Wreath Frames

Lettered pots add poetry to a windowsill garden. Herb names in serif or script sit within laurel wreaths or oval frames, painted in forest green or charcoal.
The terracotta body remains present for texture, with a soft cream panel behind each word for clarity. Stencils or transfer methods keep typography neat, while delicate leaf clusters round the motif.
A satin sealer protects against watering splashes. Displayed together, parsley, sage, and rosemary read like a kitchen chorus.
Bundled with seed packets and twine, the set makes a thoughtful culinary gift.
Steps
- Paint a soft cream oval or rectangle as a label area.
- Position lettering stencil and apply the herb name cleanly.
- Paint laurel leaves circling the label with small leaf clusters.
- Seal to protect the lettering from moisture.
Glossy Drippy Glaze Illusion Over Matte Base

Faux-drip edges mimic ceramic glazes while keeping terracotta lightweight. A matte base in putty, charcoal, or blush sets the stage, and a glossy contrasting color appears to spill from the rim in rounded drips.
Slight transparency in the drip color suggests pooled gloss. The contrast between matte body and shiny edge feels tactile and modern.
This style pairs well with contemporary shelves and sculptural plants like aloe. A high-gloss topcoat over the drips heightens realism.
Presented with a small care card, it makes a graphic, giftable piece for design-forward friends.
Steps
- Coat the pot body with a matte base color and let dry.
- Paint a glossy color along the rim, pulling rounded drips downward.
- Layer additional gloss to deepen the pooled look.
- Seal, keeping the body matte and the drips shiny.
Vintage Sunburst Rays In Retro ’70s Palette

Radiating rays capture retro cheer with mustard, burnt orange, avocado, and camel. The sunburst originates near the base or a side point and spreads upward, leaving slim clay gaps to outline each wedge.
The palette nods to record players, macramé, and shag rugs, yet terracotta keeps it grounded. Satin varnish enhances the warm hues without glare.
On a credenza with a vintage lamp, the pot plays nicely with vinyl sleeves. Gifted alongside a playlist card and a small snake plant, it channels sunny nostalgia.
Steps
- Mark a central origin point and pencil radiating wedge guides.
- Fill alternating wedges with retro colors, leaving thin clay lines.
- Refine tips and edges for crisp rays.
- Seal with a satin coat to enrich the palette.
Nordic Fair Isle Motif For Holiday Planters

Fair Isle patterns wrap terracotta in cozy rhythm. Rows of tiny triangles, snowflakes, and hearts alternate in cream over forest green, cranberry, or midnight blue bases.
The result recalls knit sweaters and candlelit evenings. Acrylics and paint pens keep edges neat across the round surface.
A soft satin or eggshell finish keeps colors snug. Styled with pine sprigs, cinnamon sticks, and warm twinkle lights, the pot sets a festive tone.
Given with a mini spruce or rosemary topiary, it becomes a winter keepsake that stays charming beyond the season.
Steps
- Paint a deep base color and let dry thoroughly.
- Lightly mark horizontal guide lines around the pot.
- Add repeating Fair Isle rows in cream using a paint pen or fine brush.
- Seal with a low-sheen coat for a soft holiday glow.