I still keep a shoebox of handmade cards from childhood, corners softened by time and ink smudges that remind me of afternoons hunched over paper. Making Valentine’s Day Card Crafts feels like a tiny ritual, a chance to turn simple scraps into something that speaks quietly to someone else.
Table of Contents
There’s a warm comfort in those little projects: the smell of paper, the scratch of pen, the surprise of a fold that reveals a secret heart.
These ideas for Valentine’s Day Card Crafts are the kind I reach for when I want something tactile and honest.
Vintage lace envelope with dried flower detail
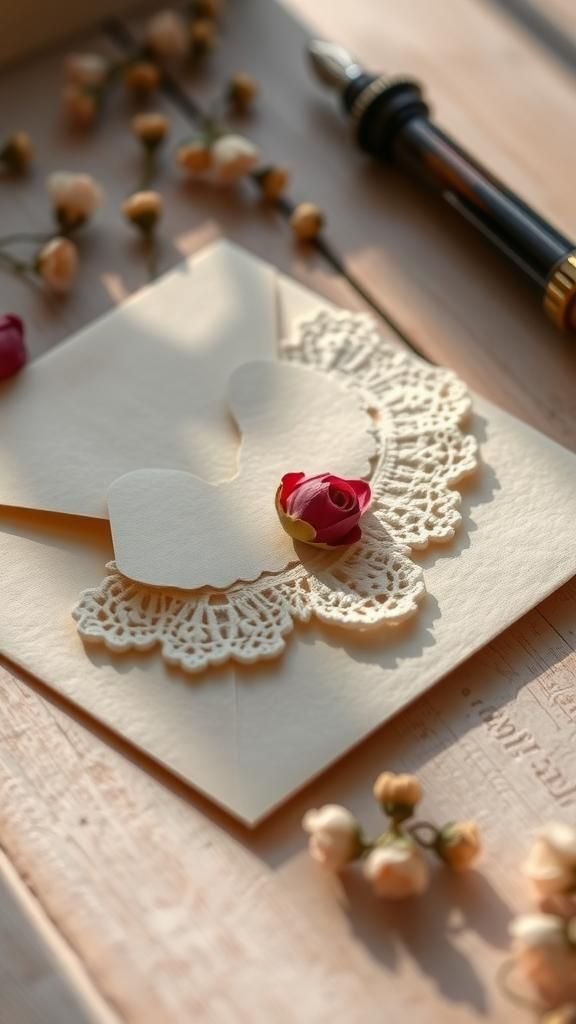
I have a soft spot for the way lace presses against thick paper, leaving gentle shadows and a hint of old afternoons. The dried petals bring a faint, sweet perfume that makes the card feel like a tiny heirloom.
A muted palette of cream and rose sits well against the roughness of deckled edges, while the lace’s pattern adds a delicate contrast. Holding one of these envelopes feels like stepping into someone else’s kitchen with sunlight on the table, quiet and warmly familiar.
Steps
- Select a heavyweight paper for the card base and trim to the desired size.
- Position a narrow strip of lace along the edge and secure it with archival adhesive.
- Tuck small dried flower fragments beneath the lace and press gently to keep them flat.
- Add a handwritten note in brown ink and slide the card into a matching vintage-style envelope.
Pop-up heart that reveals a tiny surprise inside

There’s a playful hush when a flat card springs into a small three-dimensional heart. The pop-up element casts a tiny shadow that feels like a private theater, and the surprise tucked inside can be a small sketch or a whisper of a message.
Bright paper edges catch the light, and the way the card folds back to flat makes it easy to slip into an envelope while holding the memory of that little leap. It reads like a small theatrical moment between two people.
Steps
- Fold a sheet of cardstock in half to form the card base and mark the center fold.
- Cut and fold a heart shape with tabs to create the pop-up mechanism.
- Secure the heart tabs to the inside of the card so it pops when opened.
- Decorate the heart surface and the inner space with inked patterns or a small illustration.
Watercolor wash with handwritten love note overlay

A watercolor wash can feel like a quiet ocean or a blushing sky, the pigments pooling and thinning in ways that always surprise. Over that soft field, a handwritten line in dark ink stands out like a small secret.
The ink’s edges absorb slightly into the paper, creating a lived-in look that feels intimate. I love how the color gradients shift under different lights and how a simple phrase can carry weight when cradled by soft color, like a message resting on silk.
Steps
- Lightly wet watercolor paper and apply diluted color to create a soft gradient wash.
- Allow the wash to dry completely before adding any ink to avoid bleeding.
- Write a personal message across the wash with a fine nib or brush pen for contrast.
- Optional embellishment with tiny gold flecks or a delicate border for added texture.
Layered vellum heart with hidden message beneath

Vellum has a whispery translucence that plays with light, softening whatever sits beneath it. A layered vellum heart lets a faint hint of color peek through while the hidden note underneath remains almost private.
The tactile difference between matte paper and smooth vellum feels nice under the fingertips. When tilted, the heart catches the light and reveals different levels of opacity, like something shyly revealing itself.
It’s a quiet way to make a message feel a little more guarded and tender.
Steps
- Cut a heart shape from semi-transparent vellum and position it over heavy cardstock.
- Place a short handwritten message on the cardstock beneath the vellum layer.
- Affix the vellum heart at a single point so it lifts slightly and reveals the note when moved.
- Add a soft border or a tiny stamped motif to tie the front together.
Hand-torn edges and contrasting paper textures

There’s comfort in the irregularity of hand-torn paper edges, how each pull leaves a feathery margin and a subtle shadow. When paired with a smooth metallic accent or a coarse recycled sheet, those textures create a little visual conversation.
The tactile contrast invites touch, and the uneven edges lend a casual, personal honesty to the card. A muted palette with a single bright accent can feel both restrained and expressive, like a quiet outfit with one bold accessory that draws the eye.
Steps
- Tear the edge of a textured paper sheet by hand to create a natural deckled margin.
- Layer torn pieces onto a smooth card base, arranging them for pleasing contrast.
- Secure each layer with archival adhesive and add a small accent in a complementary color.
- Finish with a handwritten note on the smooth area for legibility.
Minimalist black ink sketch with small red heart
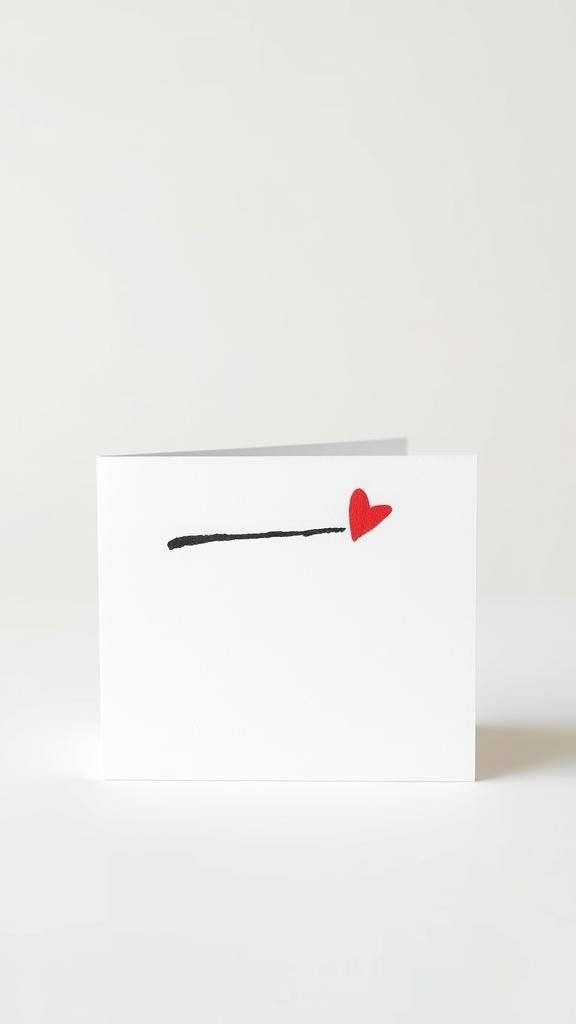
A single black line can say so much when it curves just right, and a tiny red heart punctuates that line like a pulse. The minimal palette gives the image room to breathe, and the crispness of black ink against white paper feels clean and honest.
When viewed up close, the ink shows tiny ridges and a slight sheen where the pen lingered, evidence of the hand behind it. That small red dot becomes almost audible, a little thump on the page that lingers when the card is set down.
Steps
- Fold high-quality white cardstock to create a crisp card base.
- Sketch a simple illustrative line in black ink across the front, keeping the design airy.
- Add a small red heart accent with a fine brush or marker for contrast.
- Allow ink to dry, then write a short message inside in matching black ink.
Accordion-fold mini card with layered hearts inside

Accordion folds feel playful in the hands, revealing a sequence of little panels that want to be flipped through. Each panel can host a tiny heart in a different hue, creating a rhythmic progression of color and pattern.
The motion of opening and closing the accordion is almost musical, a small private performance that delights the giver and receiver. The compact form fits neatly into an envelope yet gives the feeling of a tiny story unfolding, page by page, with a satisfying tactile click at each fold.
Steps
- Cut a long strip of cardstock and fold it into even accordion panels.
- Adhere small heart shapes to each panel, varying color and texture for contrast.
- Add a short word or doodle to some panels to create a loose narrative.
- Fold the accordion back into a compact shape and slide into an envelope sized to fit.
Seed paper heart that doubles as a planting gift

Seed paper carries an added layer of meaning; the rough texture is dotted with tiny flecks that hint at future growth. When held, it feels fragile and hopeful, like a promise folded into paper.
The earthy scent of the pulp and the flecks of color from embedded seeds make the card feel alive. The idea that a note can become a sprout gives the exchange a quietly optimistic tone, a reminder that gestures can take root and change over time in small, green ways.
Steps
- Choose biodegradable seed paper and cut it into a heart shape for the card front.
- Mount the seed paper onto a sturdier cardstock backing to protect the seeds.
- Add a brief handwritten planting suggestion inside to explain the seed paper concept.
- Package the card in a recycled envelope with a hand-applied twine tie for a natural touch.
Foil-pressed message with subtle gleaming letters

Foil brings a quiet flash when it catches the light, the letters gleaming like little reflections. The contrast between the soft paper and the metallic sheen creates a luxurious bite without feeling loud.
Running fingers over the foil reveals a slight relief that makes the words feel physically present. I appreciate how a few gleaming words can lift an otherwise simple design, giving it a moment of ceremony that sits nicely with a warm, handwritten inside message.
It reads like a whisper given a little shine.
Steps
- Choose a card stock and decide on a short phrase or word for foil application.
- Apply foil to the surface using a small foil machine or a heat transfer method suited for the chosen materials.
- Allow the foil to set fully before handling to prevent smudging.
- Write a complementary handwritten note inside for a balance of machine finish and personal touch.
Playful felt appliqué hearts with soft edges
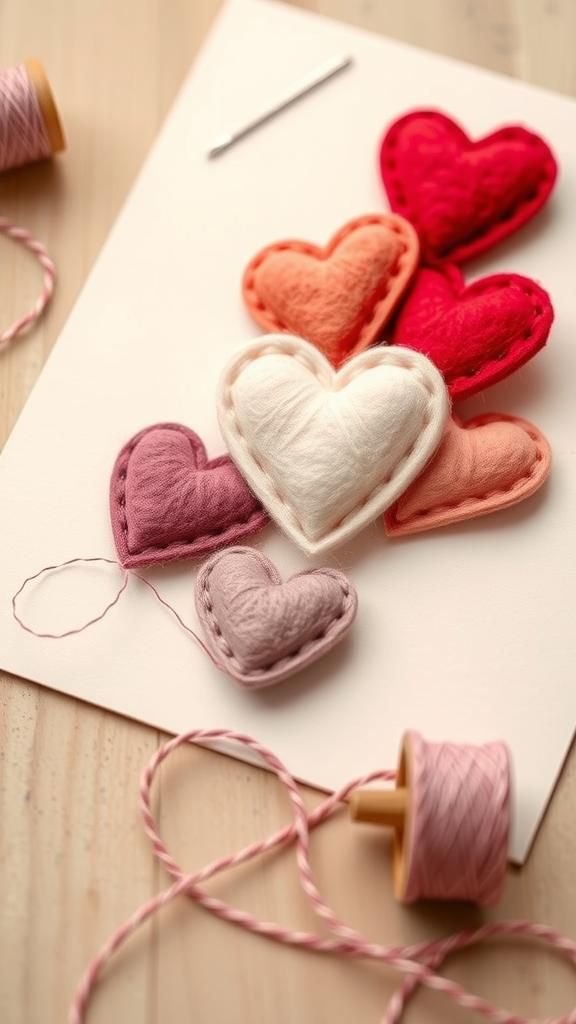
Felt brings cozy softness to the flatness of card stock, its edges slightly fuzzy and pleasing to touch. A cluster of tiny felt hearts in warm hues creates a homespun atmosphere, and the thicker texture reads as both playful and reassuring.
The fibers catch light differently, adding subtle shading to each heart. When grouped together, they look like a small flock that seems ready to hop off the page.
Holding such a card evokes knitting afternoons and quiet comforts, a handmade warmth that travels well through the mail.
Steps
- Cut small heart shapes from colorful felt pieces to create a pleasing arrangement.
- Affix the felt hearts to the card front using a strong textile adhesive or by stitching with coordinating thread.
- Trim any stray fibers for a neat appearance and add a soft fabric backing if desired.
- Write a short message inside that echoes the felt color palette for cohesion.
Polaroid-style photo card with hand-doodled border

A little instant-photo look brings a snapshot of a single moment into a card, framed with a hand-drawn border that makes it feel casual and personal. The matte image sits against crisp white margins, and the doodled edge adds personality like a marginal note in a well-loved book.
The combination of photographic detail and simple drawing creates a small story: an ordinary scene elevated by the company of the recipient. It has the charm of something pulled from a pocket and given with a quiet smile.
Steps
- Print a small square photo with a white border to mimic a Polaroid aesthetic.
- Mount the photo onto the card front and sketch a playful hand-drawn border around it with a fine pen.
- Add a short caption beneath the photo in matching ink for a personal touch.
- Seal gently and place in an envelope sized to protect the photo corners.
Pressed leaf silhouette with warm autumnal tones

Pressed leaves bring a slice of the outdoors into a card, each vein and contour preserved like a miniature map. The silhouette of a leaf in amber or rust against a soft background reads as quiet and thoughtful, invoking walks under trees and cool air.
The paper often carries a faint forest scent after pressing, and the leaf’s thinness gives the card a fragile, reverent quality. There’s a calmness to the palette, the kind that feels like a low, slow breath shared between two people in comfortable silence.
Steps
- Press a dry leaf flat for several days between absorbent paper until fully flattened.
- Mount the pressed leaf onto a card base with a small dot of archival adhesive to keep it intact.
- Frame the leaf with a subtle pencil or ink outline to emphasize its silhouette.
- Add a short, reflective note inside that complements the autumnal mood.
Tiny fabric banner stitched across the front
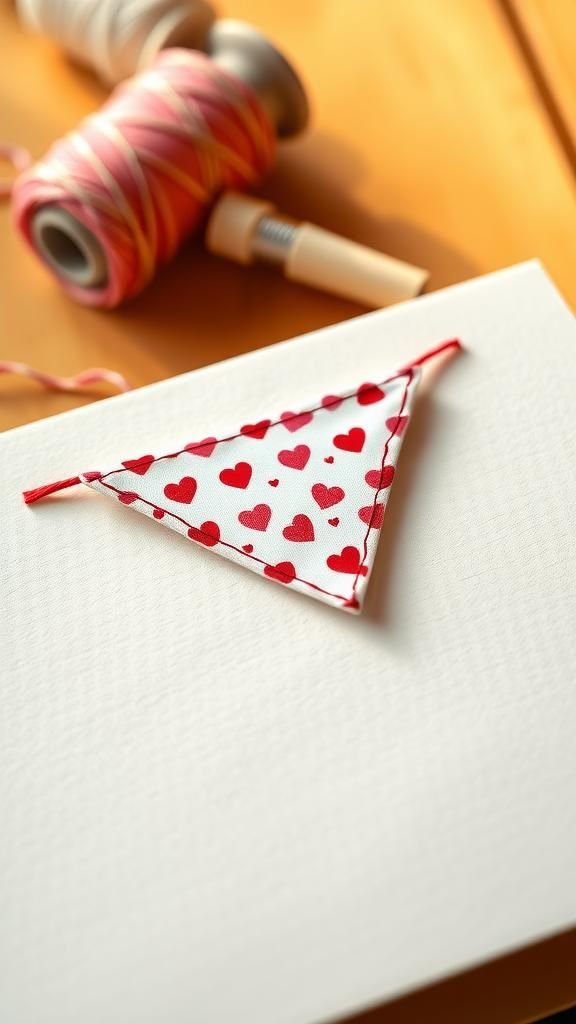
A small fabric banner stitched across a card feels celebratory in a quiet, homemade way. The slight tension of thread and the neat little stitches create a rhythm that reads as careful and friendly.
The banner fabric can have a soft pattern that peeks out between the stitches, offering a flash of color against a neutral background. The combination of textile and paper brings a domestic, tactile pleasure, like a tiny pennant waving in a still room.
It always feels as if someone baked a small kindness and wrapped it up.
Steps
- Cut a small strip of lightweight fabric and fold into a banner shape.
- Pin the banner in place on the card front and stitch across the top edge with embroidery thread.
- Remove any pins and trim excess thread, leaving tidy stitch ends.
- Optionally add a tiny stamped motif beside the banner for balance.
Hand-lettered poem with ink-splatter accents

The rhythm of hand-lettered lines feels intimate, the weight of each stroke reflecting the writer’s mood. Small ink splatters scattered around the margins add a playful imperfection, like laughter caught mid-breath.
The contrast between careful calligraphy and spontaneous splatter creates an alive quality, as if the words had to fight their way out in ink. The page feels personal and immediate, and readers often pause over a particularly heavy flourish as if listening for the voice behind the letters.
Steps
- Plan the layout of the poem lightly in pencil to balance lines and margins.
- Write the poem in ink using a dip pen or brush pen, varying pressure for expressive strokes.
- Flick a small amount of diluted ink to create tasteful splatter accents around the text.
- Erase any visible pencil marks once the ink has fully dried.
Cut-out window revealing a colored lining inside

A die-cut window offers a peek into a hidden layer, like a little secret aperture that teases curiosity. The colored lining peeking through adds depth and a pop of contrast that makes the front feel layered and intentional.
Watching how the light moves across the window edge creates tiny highlights that seem to frame whatever lies beneath. It’s a playful way to suggest something more without saying it outright, and the tactile edge of the cut-out invites a gentle touch as if the card were a tiny architectural model.
Steps
- Mark and cut a simple shape out of the card front to create a window.
- Select a contrasting colored paper or patterned liner and adhere it behind the window.
- Ensure edges are neat and the liner stays flush within the card.
- Add a simple caption or tiny motif visible through the window for an extra surprise.
Pressed petal confetti inside a translucent pocket
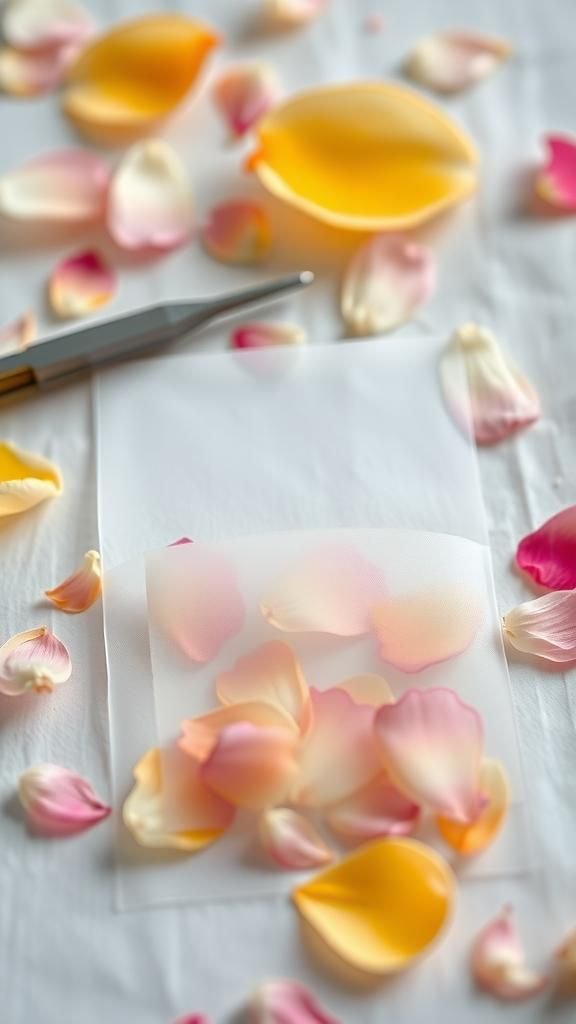
A translucent pocket filled with tiny petals reads like a little jar of summer pressed flat. The petals slide and settle when the card is moved, making a soft rustle that brings small delight.
The color fragments create a delicate mosaic visible through the pocket, and the slightly crinkled transparency adds an inviting sheen. Holding the card gives a sense of gentle containment, as if a moment was gathered and preserved for safekeeping.
The effect is both playful and sentimental, like a pocketful of remembered afternoons.
Steps
- Create a slim translucent pocket from vellum or clear acetate and seal three edges to form an enclosure.
- Place a handful of tiny pressed flower petals inside the pocket, arranging for visual interest.
- Seal the final edge carefully so petals remain secure while retaining some movement.
- Mount the pocket onto a card front and write a short note beside it.
Mini letterpress hearts with subtle indented detail

Letterpress impresses an almost architectural quality into paper, the gentle indents forming letters and shapes that invite touch. Mini hearts pressed into thick cotton stock feel like little bas-reliefs, their shadows changing with the light.
The sound of the press in my memory was low and rhythmic, and holding a letterpressed card brings some of that solidity back. The restrained look tends to read as thoughtful and calm, a handcrafted formalness that still feels warm when paired with a casual inside message.
Steps
- Choose a heavyweight cotton paper suitable for letterpress impressions.
- Arrange small heart type or plates in the press bed and ink them with a soft color.
- Run the paper through the press to achieve a clean, sunken impression.
- Trim and fold the pressed sheets into cards, pairing with a simple interior message.
Map-heart collage from places that matter most

Cutting fragments of maps and bringing them together into a heart shape feels like stitching together memories of places. Each little map fragment suggests a street, a bay, a set of coordinates that matter in private ways.
The varied blues and greens and currency of printed lines combine into a mosaic that reads like a shared story. The paper’s sheen and the tiny printed text make each piece feel like a relic, and the whole collage looks like a carefully curated memory board folded into a small, portable shape.
Steps
- Collect small map scraps from magazines, old atlases, or printed maps to create a palette of colors and lines.
- Cut those scraps into shapes and arrange them into a heart composition on a card front.
- Adhere each map piece securely and trim any overhang for a clean edge.
- Add a caption or date inside to anchor the places to a shared memory.
Embossed floral pattern with pearly ink highlights
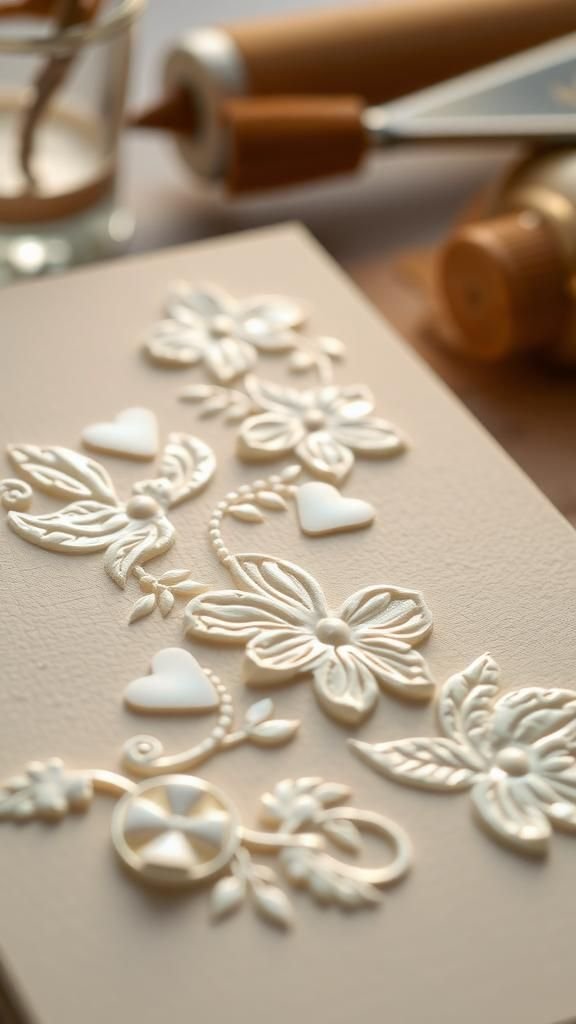
Embossing adds a gentle raised pattern that reads like a whisper across the page, and pearly ink highlights catch the eye without shouting. Floral motifs in relief feel classic and feminine, their curves creating soft shadows that shift with every tilt.
The sheen of pearlescent ink plays against matte paper, offering a subtle shimmer that looks elegant in dim or bright light. Holding such a card feels like lifting a pressed blossom; it carries a quiet formality softened by tactile warmth.
Steps
- Choose a floral embossing die or plate that complements the card size and layout.
- Run the cardstock through an embossing press to create the raised floral pattern.
- Lightly apply pearly ink over the raised areas to accentuate the texture and sheen.
- Pair with a simple, soft-toned interior to let the embossed design remain the focal point.
Tiny vellum envelope tucked into a pocket

A tiny vellum envelope tucked into a pocket reads like a whisper kept safe. The semi-transparent flap shows a hint of color but keeps details guarded, and the small scale makes the gesture feel intimate.
The pocket itself adds a delightful layer of discovery, and the interaction of paper against paper is quietly satisfying, clicking with a soft sound when opened. There’s an old-fashioned charm to the format, like a small secret between friends folded into a single page for safekeeping.
Steps
- Construct a small envelope from semi-transparent vellum sized to hold a short note.
- Create a pocket on the card front from a coordinating paper and adhere it with narrow strips of adhesive.
- Slip the vellum envelope into the pocket, leaving a little flap visible for easy retrieval.
- Add a small label or stamp to the pocket to hint at the contents.
Confetti heart shaker with glossy acetate window

Shakers have a playful rattle, the confetti moving like a tiny celebration trapped in a frame. The glossy acetate window gives a clean surface that contrasts with the lively bits inside, and the bright confetti colors bounce light in joyful ways.
The tactile sensation of shaking the card brings a childlike grin, as if joy were being released into the air for a moment. The effect reads festive and a bit mischievous, a small burst of movement within the quiet ritual of opening a card.
Steps
- Cut a heart-shaped aperture in the card front and line the back of the opening with a strip of foam tape to form a shallow well.
- Place a mix of small confetti pieces into the well, taking care not to overfill.
- Seal the well with a piece of acetate, pressing the foam tape edges to secure the window.
- Decorate the front and write a playful greeting inside to match the shaker’s energy.